Home Classes Tutorials Online Store Join
Showing posts with label 3D. Show all posts

Thursday, December 24, 2015

Frosty Fry Box Tutorial with Sharing Creativity and Company


This fun Frosty Fry Box was CASEd from a project by Ronda Wade.  For those of you who know me, I did "Cheng-it-up" slightly.  This is a quick and easy project that can hold candy and other treats.


With this video tutorial, you'll get tips for making the Frosty treat holder using Stampin' Up!'s Fry Box or Pillow Box.  Learn an easy way to hold down your ribbon while you tie the bow.

Built for Free Using: My Stampin Blog

Visit my online store to get what you want for your next project.  Remember that when you purchase $25 or more in product, you are eligible for my Rewards Program.

Creatively yours,

Sharon Cheng
Richland Hills, TX
My Online Store

Wednesday, December 23, 2015

Punch Art Santa Curvy Keepsake Box Tutorial


This Punch Art Santa is quick, easy and fits Stampin' Up!'s Curvy Keepsake Box perfectly.  It can be a Christmas ornament, Secret Santa gift or a treat holder for that special someone.


In this video tutorial with Sharing Creativity and Company, you'll learn how to make the Santa face which will fit on other items too such as a star.  I'll also give you a tip on how to cut the Curvy Keepsake box from 8 1/2 x 11" paper.  Did you know that you can get 1 1/2 boxes from each sheet of paper?

We made this little Santa in my stocking stuffer class earlier in December.  It has been the most requested tutorial from that class.
Built for Free Using: My Stampin Blog


Visit my online store to get what you want for your next project.  Remember that when you purchase $25 or more in product, you are eligible for my Rewards Program.

Creatively yours,

Sharon Cheng
Richland Hills, TX
My Online Store

Tuesday, December 1, 2015

Quick and Easy Christmas Star


Looking for a quick and easy Christmas decoration for your home or a gift for that special someone?  This quick and easy Christmas Star could be just what you need for your next crafting project.  I got the frame (including the stand) and paper mache star at my local craft store for just under $10.  Gotta love those Black Friday specials!  While the frame came with the glass and backing, I liked the look of the star against the open frame.

I covered the star with Stampin' Up!'s Typeset Specialty Designer Series Paper.  That inspiration came from the December Splitcoaststampers Challenge.

The sentiment is from the hostess stamp set, Six Sayings, in the Holiday catalog.  For the red trim and bow I used Real Red Envelope Paper.  The light-weight paper was perfect for the folded banner.


This is the how the frame looks with the stand.
Built for Free Using: My Stampin Blog

Visit my online store to get what you want for your next project.  Remember that when you purchase $25 or more in product, you are eligible for my Rewards Program.

Creatively yours,

Sharon Cheng
Richland Hills, TX
My Online Store

Botanical Gardens Occasions Catalog Sneak Peek


Botanical Gardens is a lush, tropical theme featured in Stampin' Up!'s upcoming Occasions catalog which starts on January 5, 2016.  As my time with the Splitcoaststampers Creative Crew wraps up, I used the Botanical Gardens theme along with two of the December Challenges.  This mini pizza box is one of my favorite treat boxes that can be decorated to fit any theme and only takes 1/2 a sheet of 8 1/2" x ll" cardstock.  You can fit a gift card along with a few treats in the box.  The sentiment comes from the Going Global stamp set (140748  $19).

I used the Botanical Builder Framelits Dies for both projects.  This is an easy way to cut intricate detailed flowers. 


The last challenge was to make a fun fold card.  I decided to make a quarter fold card using this Splitcoaststampers tutorial. Notice the black details on the Botanical Gardens Designer Series Paper?  Those are stamps from the Botanical Blooms stamp set that you can use to add details to the flowers.

Built for Free Using: My Stampin Blog

Visit my online store to get what you want for your next project.  Remember that when you purchase $25 or more in product, you are eligible for my Rewards Program.

Have fun checking out my Going Global sneak peek and other December Splitcoaststampers Creative Crew Challenges.

Creatively yours,

Sharon Cheng
Richland Hills, TX
My Online Store

December Splitcoaststampers Creative Crew Challenges


The December Splitcoaststampers Creative Crew Challenges featured multiple favorites.  I decided to share some of my favorites from Stampin' Up!'s upcoming Occasions catalog too!

Raindrops on roses and whiskers on kittens
Bright copper kettles and warm woolen mittens
Brown paper packages tied up with strings,
These are a few of my favorite things.

The first challenge was to use Stampin' Up!'s Typeset Specialty Designer Series Paper.  Can you find the 3 different papers that I used with the Going Global card at the top of this post?


This is a quick and easy Christmas Star.  I covered a paper mache star with the Typeset Specialty Designer Series Paper.


The second challenge was to use my favorite ribbon.  This quick and easy Peace on Earth card uses the Going Places Designer Series Paper Stack and several of my favorite ribbons.


Making a gift item was the third December challenge.  This mini pizza box can hold a gift card and a few treats.


I made this Botanical Blooms Quarter Fold card for the 4th challenge which was to make a fun fold card.  Based on Jana's suggestion,  I made this quarter fold card.  It was easier than I had imagined.

The past 4 months as a member of the Splitcoaststampers Creative Crew have been so much fun.  Join the December Splitcoaststampers Creative Crew Challenge!
We would love to see your creativity!

For more details on each project and the upcoming Occasions catalog, be sure to click on the links for each project. 

Visit my online store to get what you want for your next project.  Remember that when you purchase $25 or more in product, you are eligible for my Rewards Program.

Creatively yours,

Sharon Cheng
Richland Hills, TX
My Online Store

Saturday, November 7, 2015

Pumpkin Tutorial with Sharing Creativity


These pumpkins are quick and easy to make using Stampin' Up!'s Designer Series Paper and are easy to store when you close them.


They are made with strips of paper that are opened to form the pumpkin and closed when it is time to put them away.


Here is the video tutorial for making these quick and easy pumpkins.


Built for Free Using: My Stampin Blog

Visit my online store to get what you want for your next project.  Remember that when you purchase $25 or more in product, you are eligible for my Rewards Program.

Creatively yours,

Sharon Cheng
Richland Hills, TX
My Online Store

Sunday, November 1, 2015

November Splitcoaststampers Creative Crew Challenges


The November Splitcoaststampers Creative Crew Challenges were all about Christmas and the Children (and the Child Within). One of my favorite things about making Christmas projects is how you find yourself smiling while you are crafting.  It's fun making them and then watching someone's face when they unwrap your homemade gift.  One of my friends call it a paper hug.  I love how that describes the love that is shared when you give a gift from your heart.

The snowman and Christmas tree ended up being my favorite project even though it didn't turn out the way I originally planned.  I used the Bohemian Designer Series Paper (138446  $11) and loved the results.  It's a good thing I like all different color combinations for Christmas!  Here is the tutorial for the project. 


This project almost designed itself.  I bought the glass container at an estate sale for $2 and knew I wanted to make a Christmas scene using the Santa and reindeer from the Home for Christmas Designer Series Paper (139592  $11).  The Sleigh Ride Edgelits Dies (139670  $19) were perfect for the background.  The snowflakes are from the Season of Cheer Designer Series Paper (139590  $11).


The leftovers from the Christmas scene project above inspired me to make this ornament.  Here are the details for making this Christmas ornament.


This picture of my brother and sister with Santa makes me laugh. Notice how Santa is the only person looking at the camera.  I can't imagine how my mom felt wanting to get the perfect photo and then ending up with this one!  However, this photo has triggered many more Christmas memories than our other "picture perfect" childhood photos.

This scrapbook layout is designed to fit the 6 x 8 Project Life Photo Pocket Page (135297 $6).  It uses the Home for Christmas Designer Series Paper (139592  $11) and Holidays Fancy Foil Designer Vellum (139597  $11).

For more Christmas inspiration using Stampin' Up! products, be sure to visit the Creative Crew Gallery on Splitcoaststampers.

Visit my online store to get what you want for your next project.  Remember that when you purchase $25 or more in product, you are eligible for my Rewards Program.

Creatively yours,

Sharon Cheng
Richland Hills, TX
My Online Store

Punch Art Snowman and Christmas Tree


This punch art snowman and Christmas tree is one of my favorite Christmas projects even though it didn't turn out the way I originally planned.  I started to make the tree using Stampin' Up!'s Seasons of Cheer Designer Series Paper and didn't like the way the paper looked cut up into strips.  I ended up changing the colors to fit the Bohemian Designer Series Paper and loved the results.  It's a good thing I like all different color combinations for Christmas!


You can see the details for the punch art snowman in this video.  The punch art snowman was inspired by Lisa Curcio. I changed up a few things to fit Stampin' Up!'s current punches. 

Here are the instructions including a video tutorial for the Christmas Tree from a card I did last year.  Because the tree in this project is a little shorter than one on the card, the strips of designer series paper are only 5/8".

Built for Free Using: My Stampin Blog

Visit my online store to get what you want for your next project.  Remember that when you purchase $25 or more in product, you are eligible for my Rewards Program.

Check out my other November Creative Crew Challenge projects for Splitcoaststampers.

Creatively yours,

Sharon Cheng
Richland Hills, TX
My Online Store

Sleigh Ride Ornament


This ornament using Stampin' Up!'s Sleigh Ride Edgelits and Christmas Greetings Thinlits is quick and easy to make.  The most difficult thing about this project is waiting for the glue to dry.


Here is the video tutorial for making this sleigh ride ornament.


Remember to use a thin window sheet for this project.  Cut it out as shown in this photo (I used paper that is easier to see than a window sheet). 

After everything has dried (remember when I said waiting for the glue to dry is the hardest part?), roll the window sheet and put it in the ornament.  Fill the ornament with "snow".  I prefer "glass glitter", chunky glitter or epsom salt.  Fine glitters and some of the faux snows tend to stick to the sides of the ornament instead of settling to the bottom of the ornament.

Built for Free Using: My Stampin Blog

You can see my other November projects for Splitcoaststampers Creative Crew Challenges. 

Visit my online store to get what you want for your next project.  Remember that when you purchase $25 or more in product, you are eligible for my Rewards Program.

Creatively yours,

Sharon Cheng
Richland Hills, TX
My Online Store

Thursday, October 1, 2015

Among the Branches Halloween


One of the most versatile stamp sets in Stampin' Up!'s Holiday Catalog is Among the Branches.  You can use it for Halloween, Fall, Christmas and winter.  I used it to make three Halloween projects for a Splitcoaststampers challenge.


I was inspired by a paper sack luminaria and a project I saw at Inspire, Create, Share 2015 to make this mini luminaria.  At Stampin' Up!'s convention, they showed us how to make the Sketched Dots Gift Bag look like candy corn by using Daffodil Delight and Pumpkin Pie Classic Ink Pads.  The colors are added by patting the ink pad directly onto the bag.  You will need to mask the bag to keep the stripes straight.

After sponging on the color, score 1" along the 3 closed sides of the bag.  You then fold them to make a bag that stands up.  I did add a 2 3/4" x 2" piece of cardstock at the bottom of the bag to hold the shape.  If you like the spider web doily, be sure to order it right away to get it before Halloween.  They have already sold out several times.  Add a battery-operated candle and you have a fun mini luminaria.


You can use the same spider web doily to decorate this quick and easy Spooky card.  I got the idea to stamp the eyes on this bold striped paper from Timeless Elegance after making this card.


This card also uses the Woodland embossing folder and Happy Haunting Designer Series Paper.  After running a piece of Very Vanilla cardstock through the embossing folder, I used a sponge dauber to add a little color to the tree trunks.

I hope you have fun making your Halloween projects.  Remember to visit the Splitcoaststampers Gallery for more Halloween inspiration.  Here are all of my October Splitcoaststampers Challenges.
Built for Free Using: My Stampin Blog
Visit my online store to get what you want for your next project.  Remember that when you purchase $25 or more in product, you are eligible for my Rewards Program.

Creatively yours,

Sharon Cheng
Richland Hills, TX
My Online Store

Tuesday, September 1, 2015

Splitcoaststampers Creative Crew September Challenges


I am so excited to share the Christmas projects I've been making for the September Creative Crew gallery.  This Christmas tag with a punch art tree fits two of the challenges:  DSP/Color Focus and
Holiday Focus.  For the color focus challenge, I was supposed to pick my favorite designer series paper in Stampin' Up!'s Holiday catalog.  I could not decide between Season of Cheer and Home for Christmas, so I used both of them!  Home for Christmas has several images that are perfect for punching out single images or fussy cutting.  Season of Cheer is more user friendly for cutting up into strips or punching out repetitive designs.  Check out my tutorial for making this Christmas tag and visit the Splitcoaststampers gallery for more Christmas inspiration.


Another challenge was to feature one of the gift packaging ideas on pages 150 and 151 in Stampin' Up!'s annual catalog.  I made this Snow Place gift bag using the Gift Bag Punch Board.  See how I used punches and framelits to make this Snow Place gift bag go quickly for a demonstrator swap!


This Holiday Frame is a fun project that I designed for Halloween, Thanksgiving and Christmas for the Splitcoast challenge to make a gift item.  By changing the insert and the labels, you use one frame for all three holidays.  Check out how I used window sheets and magnets to make changing out the Holiday Frame quick and easy.
Built for Free Using: My Stampin Blog

Visit my online store to get what you want for your next project.  Remember that when you purchase $25 or more in product, you are eligible for my Rewards Program.

Creatively yours,

Sharon Cheng
Richland Hills, TX
My Online Store

Quick and Easy Holiday Frame


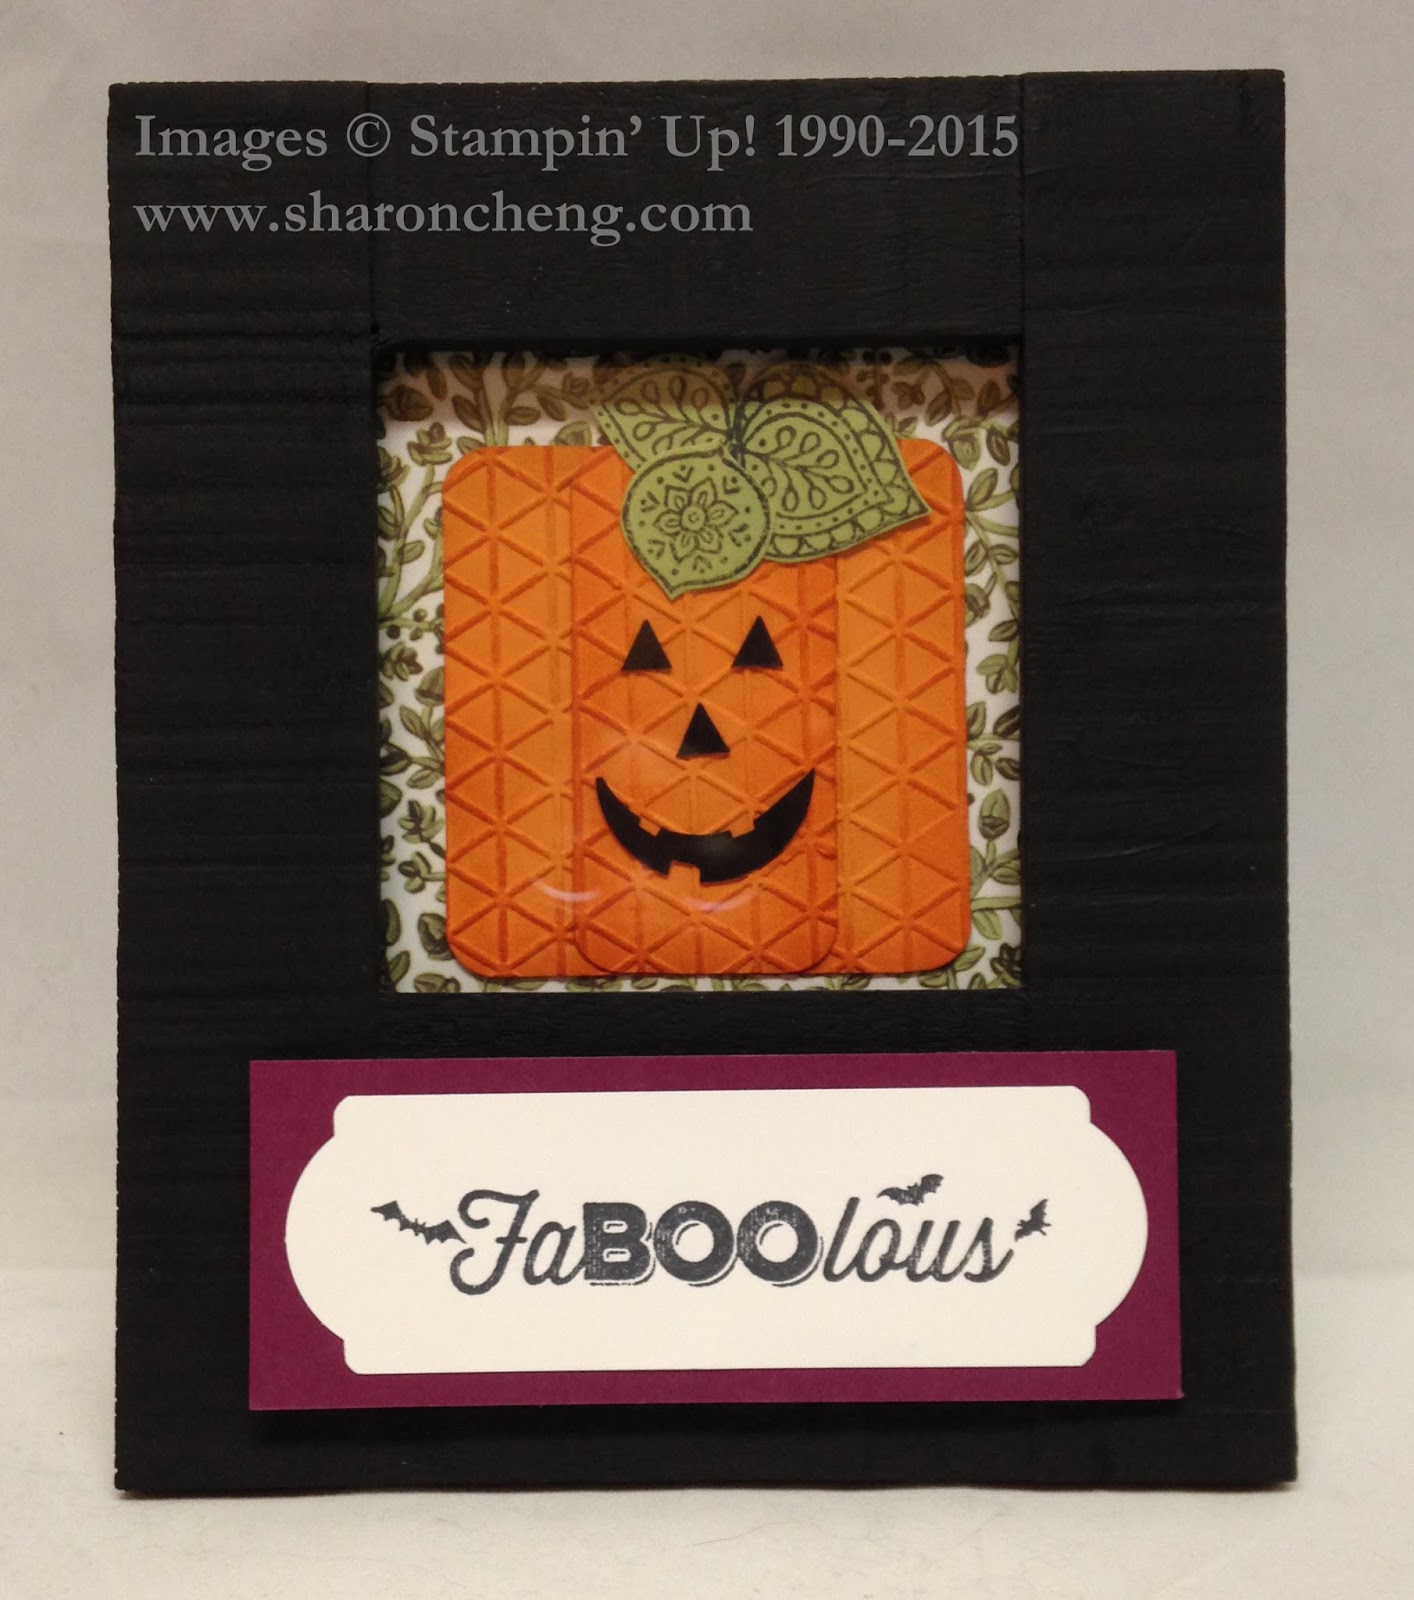
This quick and easy Holiday Frame is designed to fit many different holidays, including Halloween, Thanksgiving and Christmas.  You only need one frame and some magnets to make changing things for each holiday easy peasy.  Stampin' Up!'s Hostess Stamp Set, Six Sayings (139849 $11), is perfect for this project.


Here is the Thanksgiving version.


Notice that the pumpkin is the same for Halloween and Thanksgiving?  All I did to turn it into a jack-o-lantern was to add the window sheet with the face.  The small pieces are easy to stick onto the window sheet using Stampin' Up!'s new Fine-Tip Glue Pen.

If you look closely, you can see the magnetic strip on the bottom of the frame.   I also have magnets on the back of each label so they are easy to change for each holiday.


Here is how I used the Note Tag Punch to punch each end of the Halloween label.  For Thanksgiving, I used the Chalk Talk Framelits.


For Christmas, I used the Ornate Tag Topper and Banner Triple Punch.

Have fun making your Holiday Frame to fit your favorite holidays.  And stay tuned for future projects using this same frame.

See more Christmas and Holiday projects that I made for the Splitcoaststampers Creative Crew September gallery.
Built for Free Using: My Stampin Blog

Visit my online store to get what you want for your next project.  Remember that when you purchase $25 or more in product, you are eligible for my Rewards Program.

Creatively yours,

Sharon Cheng
Richland Hills, TX
My Online Store

Snow Way Gift Bag


I love penguins so the Snow Place Bundle was one of my first must-haves from Stampin' Up!'s Holiday catalog.  At Stampin' Up!'s Convention, we got to use the Gift Bag Punch Board.  That inspired me to make this Snow Place Gift Bag for our demonstrator swap where the theme was Bags, Tags and Boxes.  And being a big fan of Stampin' Up!'s bundles, I also had to use the Flurry of Wishes Bundle to add snowflakes.


Thanks to the framelits, it was easy to die cut the Santa hat.  The Banner Triple Punch and Snow Flurry Punch make it quick and easy to add the embellishments.  And I have fallen in love with the Real Red PomPom Trim.


Here is the video tutorial for making this gift bag.  If you have never used the gift bag punch board, be sure to watch Stampin' Up!'s how to video for this punch board.  

The colors I used for this project were Soft Sky for the gift bag, Tuxedo Black, Real Red, Island Indigo and Daffodil Delight for the penguin's beak and feet. 

See more Christmas and Holiday projects that I made for the Splitcoaststampers Creative Crew September gallery.
Built for Free Using: My Stampin Blog

Visit my online store to get what you want for your next project.  Remember that when you purchase $25 or more in product, you are eligible for my Rewards Program.

Creatively yours,

Sharon Cheng
Richland Hills, TX
My Online Store

Punch Art Tree Tutorial


This Punch Art Tree tutorial shows you how to make this quick and easy tree that you can use on cards, tags and other Christmas projects.  It combines two of my favorite designer series papers in the Holiday catalog:  Season of Cheer and Home for Christmas.


You'll use 3 of Stampin' Up!'s scallop circle punches:  1 1/4", 1 3/4" and 2 3/8".  Punch out one scallop circle with each punch and fold on the lines as shown.  Fold back 4 scallops on each side.  You'll leave one scallop at the top and 5 at the bottom.


Attach each layer with one Stampin' Dimensional at the bottom as shown.  After you make your tree, I recommend Tear and Tape adhesive to attach the tree to the tag.  The star is attached to the tag using a Stampin' Dimensional.


Here is the video tutorial for making this Punch Art Christmas Tree.


The Santa is fussy cut from the Home for Christmas Designer Series Paper and the other stars were punched using the Confetti Stars Border punch.  You'll love using Stampin' Up!'s new Fine-Tip Glue Pen to attach the small stars.

See more Christmas and Holiday projects that I made for the Splitcoaststampers Creative Crew September gallery.
 
Built for Free Using: My Stampin Blog

Visit my online store to get what you want for your next project.  Remember that when you purchase $25 or more in product, you are eligible for my Rewards Program.

Creatively yours,

Sharon Cheng
Richland Hills, TX
My Online Store