Home Classes Tutorials Online Store Join

Thursday, December 27, 2012

White Christmas in Richland Hills, Texas


We had a white Christmas in the Dallas-Fort Worth metroplex.  I walked around our neighborhood and took pictures of our winter wonderland.  This is a picture of a path a block away from our home through a wooded area.

I was inspired to make this card using My Digital Studio 2.  It's a great way to remember a wonderful Christmas Day.

If you're not familiar with the weather in this area, it rarely snows (except during Super Bowl!)  Most of the snow melted away yesterday and now the high is 41 degrees today. 

Stampin' Supplies

Item Description Price
130644 My Digital Studio 2 Download $39.95
127756 Very Merry Twenty-Five Designer Tags - Digital Download $3.95
125785 Flag Punch $ .95
118853 Scallop Circle Punch (from Punch Shapes Collection) $3.95

Visit my online store to get your supplies for this project.  Remember that when you purchase $25 or more in product, you are eligible for my Rewards Program.

Creatively yours,

Sharon Cheng
Richland Hills, TX
My Online Store

Tuesday, December 25, 2012

My Digital Studio Christmas Card


I used the Greeting Card Kids stamp brush set for this Christmas card using Stampin' Up!'s My Digital Studio 2.  While I have been wanting to use the images in this set for a long time, I wanted to color in the images.  I just figured out how to color in the image using Photoshop Elements.  If you know of an easier way, please let me know!


I started by making this image in MDS2 and saved it as a JPEG.  Then I loaded the image into Photoshop Elements and used the quick selection tool to select the different areas to fill with color.  The only problem was that using color fill also filled in the lines that gave detail to the image.  This Greeting Card Christmas Girl looked very sad without a face.

Hmmm, I was stuck for a few minutes on what to do.  My solution was to finish coloring in the areas even though I lost the details.  I saved the JPEG and uploaded it into MDS2 as a photo.  I made the photo the same size as an A2 card.  I then "restamped" the Greeting Card Christmas Girl on top of the JPEG.  It took a little bit of time to realign the images so they were exactly the same size and in the same place.  Thank goodness for the arrow keys.  My friend, Christi, showed me how to use the arrow keys to fine tune the placement of any digital images.

After that, it was relatively easy to add the sentiment and ribbon.  I love how MDS2 allows you to color parts of the stamped image and recolor the ribbon.  Now you can have ribbon and other embellishments in any color that you want!  I originally used Old Olive ribbon and changed the color to Always Artichoke.

Have a Merry Christmas!  Enjoy your time with family and friends.

Stampin' Supplies

Item Description Price
130644 My Digital Studio 2 Download $39.95
123961 Greeting Card Kids Stamp Brush Set - Digital Download $3.95
127756 Very Merry Twenty-Five Designer Tags - Digital Download $3.95
128872 Holiday Harmony II Kit - Digital Download $7.95
122156 Taffeta Ribbon Color Pack - Digital Download $4.95

Visit my online store to get your supplies for this project.  Remember that when you purchase $25 or more in product, you are eligible for my Rewards Program.

Creatively yours,

Sharon Cheng
Richland Hills, TX
My Online Store

Saturday, December 15, 2012

More Christmas Treats


Here are more treats from our Stampin' Up! demonstrator Christmas party. This canning jar filled with chocolate comes from the Holiday catalog. Melody used the Perfectly Preserved stamp set (126692 $20.95) and Cannery Set Framelits (127822 $24.95) to make this box.  Save 15% when you buy the Perfectly Preserved Bundle (129944) with the stamp set and coordinating framelits for $38.95.  Wouldn't this be a fun Valentine's Day treat if you changed the paper and colors a little?


Janet shared this hot chocolate treat that looks like a snowman. It uses the Snow Flurry Bigz Die (127813 $21.95) and silver glimmer paper (124005  $4.95).  There are so many great projects that use this die.  Check out the reindeer and Christmas card.


Kim made this Christmas gum wrapper that uses the Ornament Keepsakes Framelits (127816 $24.95), the Itty Bitty Banners stamp set (126257  $11.95) and the Bitty Banners Framelits (129267  $14.95).  This treat could also be changed to one for Valentine's Day using some of our heart-shaped punches or dies.

If you are looking for other ways to package your treats, here are some other posts with different ideas.

Hot chocolate with candy cane 

Skinny Santa

Santa Bag

Reindeer bag topper

When I went to meet my friend at Starbucks, the parking lot was filled with shoppers so it took longer than expected to get out of the lot.  Another one of advantages of making these Christmas treats is that you get to avoid the Christmas crowds!  Have fun making your Christmas treats.

Visit my online store to get your supplies for this project.  Remember that when you purchase $25 or more in product, you are eligible for my Rewards Program.

Creatively yours,

Sharon Cheng
Richland Hills, TX
My Online Store

Clearance Rack Blitz


Stampin' Up! has added new items to their clearance rack.  Take advantage of the huge savings because once these items are gone, they're gone!  Here are some of the items that have been popular.

126154 Everyday Enchantment 12 x 12 paper  $2.19
This was a Sale-A-Bration item and one of the prettiest paper packs.  Here is an angel I made with this paper.

113490 Baroque Motifs stamp set $16.79
Baroque Motifs is one of my favorite stamp sets of all time.  The designs are so versatile. 

108362 Crop-A-Dile  $11.99.  One of my most popular posts is the one with instructions for the Crop-A-Dile.


109857 Mini Library Clips $5.19
Mini Library Clips are so cute!  They're a great embellishment to add to your scrapbook pages and cards. 

These are just a few of the items that were added to the Clearance Rack.  The popular items can sell out in less than 24 hours, so order from my online store now for the best selection.

Remember that when you purchase $25 or more in product, you are eligible for my Rewards Program.

Creatively yours,

Sharon Cheng
Richland Hills, TX
My Online Store

Thursday, December 6, 2012

Christmas Angel, Reindeer and Necklace

Some of the most popular items that everyone wants are Christmas-themed little somethings.  At our Stampin' Up! demonstrator Christmas party, we exchange stocking stuffer little somethings.  We started the tradition just for the fun of sharing. It's always been a fun way to get great ideas for teacher or Secret Santa gifts. Here are some of the gifts that we exchanged last week.


This little Christmas angel was made using the scallop circle die (113468 $19.95), 2 3/8" scallop circle punch (118874 $16.95) and  Be of Good Cheer designer series paper (126896 $10.95). The die cut scallop circle cut in half makes the dress and the wings. The smaller scallop circle cut in half makes the sleeves.

We also made this Christmas angel in my stamp club. I cased this project and adapted it so that it can be used as shown here or hang as an ornament on your Christmas tree.


Christi Beck made this reindeer using the Snow Flurry die (127813 $21.95) and top note die (113463 $21.95). She said that we needed to eat the pretzels because they were really yummy, so that's the next step after I'm done taking these photos! :)


Cindy Peterson made this necklace out of a metal washer. She covered it with paper from the Be of Good Cheer designer series paper (126896 $10.95) and sealed it with crystal effects.

There was a time when gifts were not given Christmas.  Early church leaders even tried to outlaw the custom. There are many stories about how the tradition of gift giving at Christmas started.   Most of them agree that gift giving was a way to show your friendship and kindness.  And that is one of the many reasons why I enjoy making little somethings.  It's more about the value of someone's friendship than the actual value of the gift.

If you have been following my blog for awhile, then you know that I'm blessed to have such creative and talented friends. It's such a treat to see the projects that these women bring to share with the rest of our group.  I'll be posting more of the stocking stuffer gifts from our demonstrator Christmas party later.

Visit my online store to get your supplies for these projects.  Remember that when you purchase $25 or more in product, you are eligible for my Rewards Program.

Creatively yours,

Sharon Cheng
Richland Hills, TX
My Online Store


Thursday, November 29, 2012

Trimmings and Tags Bundle


Looking for cute ways to package little treats and gifts for co-workers, teachers, neighbors, and friends? Holiday packaging bundles are an affordable and adorable solution. Simply add a treat or gift and assemble.


The Trimmings & Tags Bundle includes Gusseted Cellophane Bags (25 bags; 5" x 3" x 11-1/2"), Snow Festival Designer Printed Tags (25 double-sided tags; 4-1/2" x 3-1/8"), and Cherry Cobbler 1/4" Sweater Trim (10 yards)--buy as a bundle and save 20%.  Regularly $16.85, you can get it on sale for $13.50.


Go to my online store now!  And while you're there, get this free digital download too.

Creatively yours,

Sharon Cheng
Richland Hills, TX
My Online Store

Sunday, November 25, 2012

Clothespin Wreath: Valentine's Day Version


Clothespin wreaths are fun to make and reversible!!! I used the 12-inch wreath wire frame for both this version and my Christmas wreath.  Because the clothespins are clipped to the frame, you can decorate both sides of the clothespins and flip them around for another holiday. 


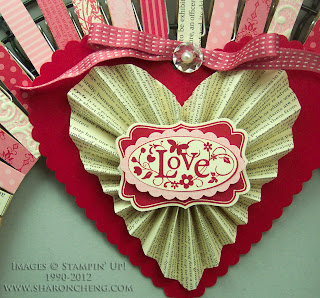
Here's a close-up of the accent piece on the Valentine's Day wreath.  It took a little bit of time to figure out how to make the heart-shaped rosette.  After playing with a few templates, I finally settled on this one.  It's quick to make using Stampin' Up!'s Designer Rosette Die.  I've used it for several other projects including my Thanksgiving Turkey and Christmas Tree


Several people have asked what I used as the base or frame for this project.  Here is a picture of the wire wreath frame that I used.  While I've been using the 12-inch version, there are smaller and larger sizes available.  I've found the frames in the floral department at both JoAnns and Michaels. While I was buying the frames for my class, someone else was buying them to make rag wreaths.  She was going to cut Christmas fabric into strips and tie them onto the frame.  I imagine her wreath is going to be  pretty cute too!

Here are the supply lists for both wreaths. 

Stampin' Supplies for the Valentine's Day Clothespin Wreath
Item Description Price
123779 You Are Loved Stamp Set $23.95
117693 Very Vintage Jumbo Wheel $8.50
117155 Brights Designer Series Paper Stacks $21.95
121878 First Edition Specialty Designer Series Paper $12.95
102482 Real Red 8-1/2X11 Card Stock $8.50
101650 Very Vanilla 8-1/2X11 Card Stock $8.50
126966 Real Red Classic Stampin' Pad $5.95
126861 Pretty in Pink Classic Stampin' Pad $5.95
119247 Pearl Basic Jewels $4.95
127555 Vintage Faceted Designer Buttons $5.95
120907 Decorative Label Punch $16.95
119856 Scallop Oval Punch $16.95
119855 Large Oval Punch $16.95
125599 Hearts Collection Framelits $26.95
125594 Designer Rosette Bigz XL Die $42.95
127819 Lacy Brocade Embossing Folder $7.95
126844 Primrose Petals 3/8" Stitched Satin Ribbon $6.95
127853 Silicone Craft Sheet $5.95


Stampin' Supplies for the Christmas Clothespin Wreath

Item Description Price
128051 Ornament Keepsakes Stamp Set $25.95
127816 Holiday Ornaments Framelits $24.95
129950 Ornament Keepsakes Bundle (save 15% on the stamp set and framelits) $42.95
126896 Be of Good Cheer Designer Series Paper $10.95
126840 Gumball Green 8-1/2" X 11" Card Stock $6.95
101650 Very Vanilla 8-1/2X11 Card Stock $8.50
126966 Cherry Cobbler Classic Stampin' Pad $5.95
126861 Gumball Green Classic Stampin' Pad $5.95
125577 Large Pearl Basic Jewels $4.95
127555 Vintage Faceted Designer Buttons $5.95
118874 2-3/8 Inch Scallop Circle Punch $16.95
127841 Cherry Cobbler 3-1/2" Scalloped Tulle Ribbon $6.95
127853 Silicone Craft Sheet $5.95

Visit my online store to get your supplies for this project.  Remember that when you purchase $25 or more in product, you are eligible for my Rewards Program.

Creatively yours,

Sharon Cheng
Richland Hills, TX
My Online Store

Friday, November 23, 2012

Designer Rosette Christmas Tree

This tree was made using Stampin' Up!'s Designer Rosette Bigz XL Die.  This Christmas Tree and my Thanksgiving Turkey were made using the same die.


I like this die because you can make 3 different designs:  the two shown here and a straight-edged rosette.  You can also make several different sizes.  The die cuts and scores your paper strips to make the rosettes.  You will need two paper strips to make one rosette.  Hot glue works the best to hold the rosettes together.


Part of the idea for this tree came from this idea on my Pinterest crafting board.  I started by making a cone out of cardstock using the instructions on the blog for the fabric trees.  I used 8 1/2 by 11 card stock and a ruler to draft the circle.  It was pretty easy using the holes that are already in the ruler.  I made the biggest circle that I could using the holes in the ruler.  I taped and stapled the circle into a tree shape and then started adding the strips I die cut using the Designer Rosette Die.

It was easiest to put Sticky Strip on the top edge of each strip of paper.  Then I cut each scored line on the rosette strip leaving a 1/4" uncut edge on the top.  I cut off strips as needed to fit the tree.  I found that I could use 3-4 sections at the bottom of the tree.  At the top of the tree, it was easiest to tape one section at a time.
For the last piece of paper at the top, I used the scallop circle on the bottom right of the Perfect Pennants Bigz Die.  It was easier to get around the pointy part of the tree using 1/4 of the scallop circle. 


At a craft show, I had seen some trees covered in newsprint with ribbons at the top. I decided to use that idea instead of the more traditional star or a plain top.  Stampin' Up!'s seam binding ribbon is perfect because you can scrunch it to give it more texture.  It comes in Cherry Cobbler to coordinate with the Be of Good Cheer Designer Series Paper. After the tree was completed, I put it on a wine glass that I bought at our local thrift store.


The Be of Good Cheer Designer Series Paper is 20% off through Wednesday, Nov. 28th.  Be sure to check it out along with the other Stampin' Up! bargains during Online Extravaganza.  I've used this paper for several different projects including my Christmas Clothespin Wreath and this Christmas card.

Stampin' Supplies for the Designer Rosette Christmas Tree

Item Description Price
125594 Designer Rosette Bigz XL Die $42.95
123126 Perfect Pennants Bigz Die $32.95
126896 Be Of Good Cheer Designer Series Paper $10.95
120992 Cherry Cobbler 1/2 Inch Seam Binding Ribbon $6.95
127555 Vintage Faceted Designer Buttons $5.95
119247 Basic Pearls Jewel Accents $4.95

Visit my online store to get your supplies for this project.  Remember that when you purchase $25 or more in product, you are eligible for my Rewards Program.

Creatively yours,

Sharon Cheng
Richland Hills, TX
My Online Store


Thursday, November 22, 2012

Happy Thanksgiving

Today I am thankful to have some time to play with My Digital Studio 2.  I've had the program for awhile, but haven't had a lot of time to use it.  You can buy MDS2 for 50% off this week!

This digital card uses a photo of my Quirky Turkey that I made earlier this month.  This Thanksgiving Turkey has become one of my top 5 blog posts.  He's thankful that he gets to come back every year because he isn't good to eat!

For the photo of the Thanksgiving turkey, I changed the background to More Mustard.  That made a great background for the sentiment from the 2013 Quotable Calendar Template digital download (128138 $14.95). This digital kit was designed to make a calendar.  However, the download includes a 41-piece stamp brush set, 6 Designer Series Papers, and 12 embellishments that you can use for other projects like this card.

We made the Designer Rosette turkey at stamp club last Sunday.  Everyone had a great time making their turkeys.  It's much easier when you use the Designer Rosette Bigz XL Die. The difference is that they used the smallest pearl from Basic Pearls Jewels Accents (119247 $4.05) and colored it black with a Sharpie marker for the eyes.

Have a wonderful Thanksgiving and count your blessings!

Avoid the Black Friday crowds and shop online with Stampin' Up!'s Online Extravanganza.

Creatively yours,

Sharon Cheng
Richland Hills, TX
My Online Store

Thursday, November 15, 2012

Christmas Clothespin Wreath


This cute Christmas wreath is made using clothespins.  Two of the demonstators in my group made clothespin wreaths for fall and they inspired me to make this one for Christmas using Stampin' Up!'s Be of Good Cheer Designer Series Paper.

Because the wreath uses clothespins pinned to a wire frame, you can decorate the other side of the clothespins for a different season.  When it's time to change your decorations for a different holiday, you flip the clothespins around and you have a wreath ready for your next event.  I like the idea of using the same wire frame and changing out the clothespins.  It greatly reduces the amount of storage space you need.


On the other side of the clothespins, I used Stampin' Up!'s Howlstooth & Scaringbone Designer Series Paper which can be found in Stampin' Up!'s Holiday catalog.  This paper is perfect for Halloween, Thanksgiving and fall.  My friend, Connie, gave everyone this Halloween witch at our fall scrapbook retreat.  She was perfect for turning this into a Halloween wreath.


To decorate the wreath, I CASE'd the ornament on the cover of the Holiday catalog using the Ornament Keepsakes stamp set and Holiday Ornaments Framelit dies.  I didn't have the Designer Rosette Bigz XL die with me at the retreat, so I used the scallop circle punch to make a slightly different rosette for the center of this ornament. For the center of the ornament, I used my new favorite combination of Stampin' Up!'s vintage faceted designer button and a pearl.


Using a hot glue makes it easier to assemble the ornament and add the tulle.  When I'm working with hot glue, my new favorite tool is this 6 x 6 silicone craft sheet.  It protects your work surface from the hot glue and the heat from the hot glue gun.  When you're finished, you can pop off any of those hot glue bits that end up on the silicone craft sheet.


Here is the Valentine's Day version.  It was fun figuring out how to make the rosette heart.  

You can make the clothespin wreath for both Christmas and Valentine's Day in a class I'm teaching.

Date:  Saturday, December 1
Time:  2 to 5 pm
Location:  Arlington, TX
Cost:  $25 fee includes kit

The kit includes the wire frame, clothespins and everything you need except for adhesive.  Contact me at sharon@sharoncheng.com to register for this class.

Stampin' Supplies for the Christmas Clothespin Wreath

Item Description Price
128051 Ornament Keepsakes Stamp Set $25.95
127816 Holiday Ornaments Framelits $24.95
129950 Ornament Keepsakes Bundle (save 15% on the stamp set and framelits) $42.95
126896 Be of Good Cheer Designer Series Paper $10.95
126840 Gumball Green 8-1/2" X 11" Card Stock $6.95
101650 Very Vanilla 8-1/2X11 Card Stock $8.50
126966 Cherry Cobbler Classic Stampin' Pad $5.95
126861 Gumball Green Classic Stampin' Pad $5.95
125577 Large Pearl Basic Jewels $4.95
127555 Vintage Faceted Designer Buttons $5.95
118874 2-3/8 Inch Scallop Circle Punch $16.95
127841 Cherry Cobbler 3-1/2" Scalloped Tulle Ribbon $6.95
127853 Silicone Craft Sheet $5.95

Visit my online store to get your supplies for this project.  Remember that when you purchase $25 or more in product, you are eligible for my Rewards Program.

Creatively yours,

Sharon Cheng
Richland Hills, TX
My Online Store

Thanksgiving Turkey Using Designer Rosette Die

Looking for Thanksgiving projects? 


I saw this turkey on Tim Holtz's blog and just had to make it with Stampin' Up! materials.  It gave me a chance to use my Designer Rosette Bigz XL die.  You can change the sizes of the rosettes by cutting your paper strips in different widths.  To make the three different sizes for this project, I cut the strips 1 1/2" x 12", 1 5/8" by 12" and 2" x 12".  You'll need two strips of each size to make one rosette.  I used the Howlstooth & Scaringbone Designer Series Paper which works for both fall and Halloween.


I used the pointed end of the rosette for the turkey.  You can see how the scalloped end looks on this Christmas tree that I made.


For the body of the turkey, I glued two pieces of cardstock together and cut out the pattern provided by Tim.  I cut a slit in the scallop circle in the center of the rosette and added a little glue to hold the turkey body in place. 


I sponged the rosettes before they were assembled.  It was much easier to add shading with Soft Suede classic ink when the paper was still flat.  Hot glue seems to be the best way to glue the rosettes to each other.

While you can't see it in the picture, I used another scallop circle at the bottom to make a stand for my quirky turkey. 

Have fun making these turkeys for your Thanksgiving celebration.  It's quick and easy thanks to the Big Shot and Stampin' Up!'s exclusive Designer Rosette Bigz XL die.

Stampin' Supplies

Item Description Price
125594 Designer Rosette Bigz XL Die $42.95
126906 Howlstooth & Scaringbone Designer Series Paper $10.95
102316 Naturals White 8-1/2X11 Card Stock $7.50
126968 Riding Hood Red Classic Stampin' Pad $5.95
126978 Soft Suede Classic Stampin' Pad $5.95
127811 1-1/4" Scallop Circle Punch $15.95

Visit my online store to get your supplies for this project.  Remember that when you purchase $25 or more in product, you are eligible for my Rewards Program.

Creatively yours,

Sharon Cheng
Richland Hills, TX
My Online Store

Friday, October 26, 2012

More Christmas Swaps

Here are some more pics from the Christmas swap we had at our last demonstrator meeting.

Remember that on Monday, Oct. 29th, you can get most of Stampin' Up!'s stamp sets for 15% off.  You'll have time to get what you want to make your Christmas cards.


Marilyn Young made this beautiful card using the Watercolor Winter stamp set (129727  $18.95) from the Holiday mini catalog.

Look carefully and you'll see the rhinestones she put in the center of each poinsettia.  Yes, they're Stampin' Up!'s Basic Jewels (119246 $4.95).  How did she get red ones?  With a red Sharpie marker!  While the rhinestones come in clear, you can make them any color you want with Sharpie or other solvent-based markers. 


Christi Beck made this cute hot chocolate holder with a candy cane stir stick. It only takes 1/2 a sheet of card stock. She used the Wacky Wishes hostess stamp set which is free with a minimum $150 order or workshop.


Janet Holmes made this gorgeous card using several items out of the Holiday mini catalog.

Champagne Glimmer Paper  127885  $4.95
Snow Flurry Die 127813  $21.95
Greetings of the Season stamp set  128033  $11.95
Lacy Brocade Embossing Folder  127819  $7.95
Candlelight Christmas Specialty Designer Series Paper  126901  $12.95

I hope you have been inspired with these projects and the ones I posted earlier.

Have fun making your Christmas projects. Remember to stop by my online store on Monday, October 29th to take advantage of Stampin' Up!'s 15% off sale!

Creatively yours,

Sharon Cheng
Richland Hills, TX
My Online Store

Thursday, October 18, 2012

Christmas Swaps


In October, the swap theme for my downline meeting was Christmas!  It was so much fun swapping and getting different ideas for Christmas.  It's great knowing so many talented people who can create such different projects using paper. 

This first card was made by Karen Hale.  She used Stampin' Up!'s new Snow Flurry Bigz die (item 127813 $21.95).  After seeing this snowflake used in several different ways, I decided to get it.  I look forward to creating some fun projects to share with you in the future.


Gail Peterson made this card using the Delightful Decorations stamp set (127787 $16.95).  She used the leaves from the bird builder punch (117191 $16.95) to make the branches. 


This is a snowflake made by Mary Hamilton.  She does a great job of making projects using paper folding techniques.  She's going to show us how to make this snowflake at our November demonstrator meeting.  I'm looking forward to learning to make this snowflake.

I'll share more of the swaps that I got this month in future posts.

Creatively yours,

Sharon Cheng
Richland Hills, TX
My Online Store

Monday, October 15, 2012

Christmas Snowflake Soiree


The Operation Write Home Bloghop was so much fun.  There were many wonderful cards on the bloghop.  I was inspired to make this card thanks to a card made by Pamela Young. 


Here is Pamela's sketch.  Her card reminded me of a quilt pattern called Cathedral Windows.  Thankfully, Cathedral Windows is much easier to make with paper than it is to make with fabric!

The Very Vanilla card stock is cut 3 x 4 1/4 inch.  The Cherry Cobbler mat is 3 1/8 x 4 3/8.


 To make the windows, I punched seven circles with my 1-inch circle punch.

I then folded each circle around a template I made of a 5/8" circle.  It's easier to fold if you'll use chipboard to make your template.

Using a clear mount stamp made it much easier to stamp the "Believe" sentiment in the right place.  I stamped the sentiment and then added the windows.

Stampin' Supplies

Item Description Price
127925 Snowflake Soiree Stamp Set $21.95
126896 Be Of Good Cheer Designer Series Paper $10.95
119868 1-inch Circle Punch $12.95
119246 Rhinestone Basic Jewels (Card 2) $4.95

Please remember that when you order from me, you are eligible for my Rewards program.  For every $25 you order, you get credit toward a free stamp set of your choice. 

Creatively yours,

Sharon Cheng
Richland Hills, TX
My Online Store