Home Classes Tutorials Online Store Join

Friday, December 25, 2009

Merry Christmas


I hope everyone is having a Merry Christmas. If you're in the Fort Worth area, then you know that we are having a rare White Christmas this year. We went from 70 degree weather on Wednesday to snow on Thursday.

For stamp club, I designed this card that could easily be a Christmas or Valentine's Day card depending on which stamp you used. As the Holiday mini catalog ends on January 4th, I wanted to use both the Wandering Words stamp set and Christmas Cocoa paper. Two of the papers in the set are flocked. I love how this paper looks with just the flocking or when you add glitter.


The good news is that the Christmas Cocoa paper is available as a download for My Digital Studio. While the paper won't be flocked, the designs will be still be available.

Happy stamping,

Sharon Cheng
Richland Hills, TX
My Stampin' Up! Website

Friday, December 11, 2009

Sale on Big Shot Dies and Accessories


Stampin' Up! is offering some Big Shot Dies and Accessories at sale prices for 12 days only. This sale ends on Tuesday, Dec. 22nd. Several of the dies are exclusive to Stampin' Up!

They are also offering Decor Elements sheets in many favorite Stampin' Up! colors. These sheets can be used in the Big Shot to die cut your favorite images. Please note that some Décor Elements sheets are 12" x 24" and some are 15" x 24" as Stampin' Up! transitions to the larger sheets.

Click here to see what is on sale.


This reindeer box uses the Tulipe Stampin' Up! Bigz Die to make the antlers!

Check back as I continue to post other projects that uses some of the dies that are on sale.

Happy stamping,

Sharon Cheng
My Stampin' Up! Website
Richland Hills, TX

Sunday, November 22, 2009

Dasher in the Woods Card


This card is one of my stamp club projects. While it may look complicated, it is a quick and relatively simple card. Once again, I'm using the Dasher stamp. I have used this stamp in three different Christmas cards!

Supply List
Item Description Price
116816 Dasher Stamp $8.95
115026 Lovely As A Tree Stamp Set $27.95
115370 Teeny Tiny Wishes Stamp Set $36.95
105209 Classic Stampin Pad Bashful Blue $5.95
102265 Classic Stampin Pad Bordering Blue $5.95
102977 Classic Stampin Pad Night Of Navy $5.95
103133 Classic Stampin Pad Real Red $5.95
100867 Card Stock Night Of Navy 8 1/2X11 $5.50
102482 Card Stock Real Red 8 1/2X11 $5.50
102028 Card Stock Confetti White 8 1/2X11 $9.50
109046 Punch 1 Inch Circle $10.95
105090 Punch Word Window $15.95
116630 Punch Modern Label $15.95
101610 Stamping Sponges $3.50
102023 Glitter Dazzling Diamonds $4.50
100425 2-Way Glue Pen $3.50

Cut the following pieces of cardstock.

Night of Navy: 8 1/2 x 5 1/2 inches
Real Red: 5 1/4 x 4 inches
Confetti White: 5 x 3 3/4 inches

Step 1

Stamp the trees with Bordering Blue and Dasher with Night of Navy.

Step 2

Make a mask by stamping the trees on a scrap that is wider than the card. Cut the scrap along the ground line. You will have to extend it beyond the stamped image.

Make a second mask by punching out a 1 inch circle.

Put removable adhesive on the back of both masks. While there are many different removable adhesives, my favorite is to use SNAIL on the back of the mask. Then stick the mask to your clothing and peel it off a couple of times. The lint from your clothing will make the SNAIL and mask removable when you use it on paper.

Place the masks as shown in the picture.

Step 3

Lightly sponge Bashful Blue ink through the sky and beneath the trees. Remember to use a light touch similar to how you would apply blush to your face. Go lightly and blend out the edges. You want parts of the sky to be lighter and some areas to be darker.

Step 4

Using Night of Navy, darken the sky especially beneath the trees and by the moon. Again, you want to blend the edges and have areas of light and dark.

Move the mask you used for the ground line to make it look like Dasher is standing on a small hill. Use the same sponge with Night of Navy without adding more ink. You can also add a few shadows in the snow especially beneath the trees. Again, sponge lightly and blend your edges.

Step 5

Step 5 is optional and doesn't show up well in this scan. I added glitter here and there in the snow, especially under Dasher. My favorite way to add glitter is to use our 2-Way Glue Pen. The pen tip makes it easy to add as much or as little glitter as you would like.

Assemble the card per the picture and you are done! Many thanks to Carridine for inspiring me to put together this tutorial. If you have any questions about this technique, please post a comment here.

Sharon Cheng
www.sharoncheng.stampinup.net
Richland Hills, TX

Monday, November 9, 2009


Did you notice the new buttons underneath my blog banner? They are there to help you move more quickly through this site. I learned how to add them from Super Blogger at my retreat this past weekend. Many thanks Cari for your help and patience. Cari is planning to put together a class on blogging early in 2010. If you're interested, please let me know and I'll share your contact info with Cari.

Why the costume? At the retreat, the theme was Super Heroes. Here are the different super heroes who came to the party!


Happy stamping,

Sharon Cheng

Saturday, November 7, 2009

Fall Projects


I've at a retreat at the Covered Bridge Inn in Weatherford and I'm actually being productive! Here are some of the projects that I've been working on. I am in love with the colors in the Autumn Meadows Designers Series Paper. The color combination is Taken With Teal, More Mustard, Really Rust, and Chocolate Chip.

I've been wanting to make the pumpkin basket with the Pillow Box die for some time now. It is fun and easy to make. It will make a great hostess or thank you gift.


I thought you might get a good giggle about what my set up looked like for the above photos. I had to make do with what I had. Another good example of how cropping can really enhance your subject matter!

Happy stamping,

Sharon Cheng
www.sharoncheng.stampinup.net
http://scandcompany.blogspot.com/

Thursday, November 5, 2009

Christmas Classes

Can you believe that Christmas is less than 2 months away? I have several classes to help you get ready for Christmas.


Christmas Garland (or Wreath)
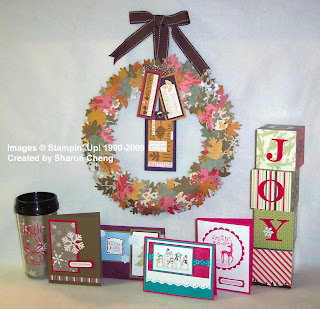
Create a beautiful holiday paper garland using assorted Christmas paper and ribbon. This project is a perfect combination of quick, simple, and gorgeous. This festive garland is will dress up any mantel or Christmas tree or it can be used as a wreath. The picture above shows the garland as a wreath.

Date: Thursday, Nov. 12th
Time: 6:30 to 8:30 p.m.
Where: North Richland Hills
Class fee: $30, includes all supplies


Christmas Stocking Make and Take
Another quick project using Christmas paper. Once you make one, you'll want to make more for the special people on your Christmas list. It's a decoration that can be used to hold a gift card or other small treasures. This is a come and go project. Plan on about 20 minutes to complete your stocking.

Date: Saturday, Nov. 21
Time: 1 - 3 p.m.
Where: North Richland Hills
Project fee: $4, includes all supplies.

Stocking Stuffers and More
These quick and easy projects are perfect for your Secret Santa gifts and stocking stuffers. Choose your projects and how many of each you want to make. You'll be able to complete these last minute gifts in one afternoon!

Date: December 5, 2009
Time: 1 to 5 p.m.
Where: St. Michael's Anglican Church in Richland Hills
Fee: $5 plus project fees

Projects
Please notice that for several of the projects, additional kits are discounted.


Envelope Book $6, additional kits for $4
We have had several requests to repeat this fun project. Add your own photos to make this a one-of-a-kind gift.


Etched Glass Candle Votive $2
This is for everyone who has been asking for another etched glass project. Turn a plain glass votive into a snowflake sampler. Learn a quick technique to etch glass that you can use again and again


Felt Snowflake Purse $3, additional kits for $2
I saw a similar gift card holder and just had to make this one out of felt. The scallop edges are a snap to make with the Big Shot scallop square die.


Reindeer Box $5 additional ones for $3
This has to be one of the cutest reindeer boxes that I have seen. You can fill the box with goodies for gift giving. It can also be used to hold Christmas tags.


Travel Mug $5, additional ones for $4
each kit includes a travel mug

This travel mug is decorated with paper using the Joseph’s Coat technique. This technique can be used with many other projects. You’ll leave with scraps to make a coordinating card or gift tags.


Triangle Box $2 for 3 boxes
The triangle box is a quick and easy way to make a box that you can fill with treats or small gifts.

To register for any of these classes, contact Sharon Cheng at cheng1170@sbcglobal.net.

Sunday, October 18, 2009

My Digital Studio


This is my first card using My Digital Studio. I'm finally getting through some of the learning curve for this program. After making the card, I was inspired to make a new banner for my blog. You'll notice that I used some of the same colors and elements.

One of my favorite things about My Digital Studio is that you can use images from rub-on's, retired In Colors and designer series papers without worrying about running out of anything.

For those of you who have other digital crafting programs, you can download Stampin' Up! images as long as your program can use JPG's. The easiest way to see the downloads is to go online via my website. They just added some new items last week including two of my current favorites, the Medallion stamp and the Night and Day designer series paper.

Sharon Cheng
www.sharoncheng.stampinup.net
http://scandcompany.blogspot.com/

Tuesday, October 6, 2009

Holiday Hoopla


Holiday Hoopla is a day when you can make multiple holiday gifts and cards. You pay $5 to come to the event and choose your project(s) for the additional fees listed. You’ll receive your supply list when you register. Deadline for registration is October 17.

Saturday, October 24
1 to 5 pm
St. Michael’s Church, 3800 Popplewell St, Richland Hills, TX 76118

Holiday Projects
Gratitude Wreath: $20
Joy Blocks: $25
Christmas Travel Mug: $7 (optional Décor Elements is extra)
Envelope Book: $6 (pictured below)
Christmas Cards: $2 each


Christmas Stamp-A-Stack
Saturday, October 17th
1 – 5 p.m.
South Ft. Worth
You will create 16 wonderful Christmas cards (4 each of 4 designs). All you need to bring is your adhesive.
Class Fee: $25 when you register by October 10th. $30 after October 10th.

This is a great time to order your Christmas cards and gifts and let us do the cutting for you!

To register for either event or to see more pictures of the projects, please contact me at cheng1170@sbcglobal.net.

Sharon Cheng
Richland Hills, TX

Sunday, August 23, 2009

Crop for a Cure


Yesterday was a great day at the Crop for a Cure. There were over 75 women at this event to help raise funds for the Susan G. Komen Foundation. The event was well organized and a great time was had by all.

This is the 6 x 6 scrapbook page that I taught at the event. I’ll be teaching the companion page at Take A Break craft night on Friday, Sept. 11. It was ironic that when I was designing the two pages, I was torn between helping raise funds for Susan G. Komen and the American Heart Association. My subconscious brain must have worked it out. I realized this morning that I have a butterfly on the page I designed for the Crop for a Cure and a heart on the page that I will use to help raise funds for the American Heart Association. Both causes are near and dear to my heart as my mother is a 17-year breast cancer survivor and my dad is a stroke survivor (the American Heart Association also supports stroke research).

Both pages will also be available at Scrapper’s Boutique.

Happy stamping,

Sharon Cheng
www.sharoncheng.stampinup.net
http://scandcompany.blogspot.com/

Friday, August 21, 2009

Baroque Twill Ribbon


One of the things I enjoy most about rubber stamping is its versatility. For the most part, you can stamp just about anything if you can get ink to stick to it.

I'm in the middle of prepping the ribbon for a Crop for A Cure 6 x 6 scrapbook page. Here is a picture of the twill ribbon that I am wheeling with Melon Mambo ink and the Baroque Border Wheel. The ribbon on top is how it looks when you get it. The next strip is how the ribbon looks when it is stamped. The third strip is a piece of paper that I wheeled with the same Baroque Border and ink. You can see how the image is softer and lighter on the ribbon since the fabric soaks up some of the ink.

Time to get back to "making baroque ribbon". I'll post a picture of the scrapbook page tomorrow.

Here is the supply list if you would like to try this technique. Please share how it works for you.

Item Description Price
105245 Twill Tape $5.95
109675 Wheel Baroque Border $6.50
102971 Stampin Around Handle $3.95
101529 Stampin Around Cartridge Un-Inked $5.25
115662 Classic Ink Refill Melon Mambo $2.95

Happy stamping,

Sharon Cheng
www.sharoncheng.stampinup.net
http://scandcompany.blogspot.com/

Monday, August 10, 2009

Faux Metal Embossing Tutorial


One of my customers, Irma, does beautiful metal embossing using traditional methods. This involves working a sheet of metal using specialty tools. She makes wonderful, one-of-kind treasures that take time and patience. I wanted to make something that had the flavor of metal embossing using Stampin' Up! tools. This notebook is what I designed for my downline who went to Stampin' Up!'s convention in Salt Lake City. It uses a faux metal embossing technique that is easier and faster than traditional metal embossing.


Step 1. Stamp your image with Versamark and heat emboss with embossing powder. Since these pieces will be covered, it's a great way to use up your scrap cardstock. I have no idea why I ever bought lavender embossing powder! I used the background stamp, Tres Chic for this project.

Step 2. Use your Big Shot, textured cardstock and the Serif Essentials Alphabet die to make the monogram. Adhere your monogram to the embossed cardstock.


Step 3. Cover the entire piece with aluminum tape that you can purchase at a hardware store. I found 3 in. wide aluminum tape at Harbor Freight if you have that store in your area. The project doesn't look so great at this point.


Step 4. Run the piece through the Big Shot similar to how you would use a texture plate. Going from bottom to top, make your stack using the following items: Multipurpose Platform on Tab 2, one Standard cutting pad, the piece of cardstock with tape side up, Silicone Rubber pad and then the Texturz Impressions Pad. You could stop here if you didn't want to add paint for more dimension.


Step 5. Cover the entire piece with acrylic paint. This is another one of those steps that doesn't look too good at first.

I used white acrylic paint that I dyed with Classic Rose Red ink. Add a few drops at a time. You don't need a lot of paint or ink. Once the paint is dry, you can rub off most of it with a paper towel. That's how I ended up with the piece that I used for the notebook pictured at the top of this tutorial.


This is the card that I made for my convention swap using this technique. I simplified it by skipping Steps 2 and 5. Because I made about 50 cards, for Step 1 I baked the cardstock in my craft oven instead of using the heat tool. Things went much faster that way.

Being able to use stamps to get a variety of images is what I like most about this technique. Stamps with thin or really bold images don't seem to work as well with this technique.

Questions? Please leave a comment and I'll post the answer for everyone since more than one person may have the same question.

Happy stamping,

Sharon Cheng
www.sharoncheng.stampinup.net
http://scandcompany.blogspot.com/

Thursday, August 6, 2009

Stampin' Up! Convention


Kathryn and I have been doing so much at the Stampin' Up! convention, we're feeling a little fuzzy headed. Do you like our new stamp?

Sharon Cheng
www.sharoncheng.stampinup.net
http://scandcompany.blogspot.com/

Sunday, July 12, 2009

Christmas In July Workshop


It's time to get a jump start on your Christmas cards. Join us for a fun afternoon of stamping and getting in the Christmas spirit. You will leave with a total of 16 cards with envelopes (4 each of 4 designs).

This is one of the cards that was made by my friend, Judy Hogan, for this class.

Where: West Fort Worth
When: Saturday, July 25 OR Sunday, July 26 from 2 to 5 p.m.
Class Fee: $25 if you register by July 18, $30 if after July 18.

Your class fee includes all supplies except your adhesive. You may pre-order SNAIL adhesive for $8.28 which includes shipping and handling and tax.

If you would like to register for this class, please leave a comment here or contact me at cheng1170@sbcglobal.net.

Sharon Cheng
Richland Hills, TX

Thursday, July 9, 2009

Open House and Retired Stamp Sale


This card uses the new Razzleberry Lemonade paper and Rich Razzleberry and Crushed Curry cardstock. It's a quick card that you can make at our Open House and Retired Stamp sale this Friday, July 10, from 7-9 p.m. at St. Michael's Anglican Church, Richland Hills, 76118. We'll be in the fellowship hall behind the church.

Thanks to my Stampin' Up! friends, we'll have over 100 retired stamp sets, paper, inkpads and samples for sale at the Open House. Please come early for the best selection.

Happy stamping,

Sharon Cheng
www.sharoncheng.stampinup.net

Friday, June 26, 2009

Paper Flower Bouquet


Can you tell that I've been obsessed with making paper flowers lately? I designed this project for my class on Sunday. I love the way the Basic Gray paper makes the colors in the flowers pop!

Happy stamping,

Sharon Cheng
www.sharoncheng.stampinup.net
http://scandcompany.blogspot.com/

Thursday, June 4, 2009

Sneak Peek


I had to make a quick get well card tonight. My box of sneak peek items from the new catalog arrived today so I got to play with some of my new toys at the same time!

Stamp Set: Lots of Bots
In Color Cardstock, Classic Ink Pads and Markers!!!: Crushed Curry, Dusty Durango and Bermuda Bay

Sharon Cheng
www.sharoncheng.stampinup.net
http://scandcompany.blogspot.com/

Monday, May 25, 2009

Paper Flowers


I had such a good time creating these flowers using my Big Shot. I used the Daisies #2 die. This is a green project since I used pages from an outdated reference manual. I had a wonderful time going through my button stash to find ones to use as the centers of these flowers.

Many thanks to Lisa Pace for the inspiration.

Happy stamping,

Sharon Cheng
Richland Hills, TX
www.sharoncheng.stampinup.net
http://scandcompany.blogspot.com/

Sunday, May 10, 2009

Use It Up Class


Here are the projects for this Sunday's Use It Up Class. The first project is this circle book. What I like about this project is that you can cut out the circles with the Big Shot Circle Die. That makes this project go quickly.


When you open the book, you can see each page separately. I've taken a picture of several of the pages at once to give you a better idea about the project.


The second project is this quilt card. As a quilter, I especially enjoy this card. It goes much faster than a regular quilt!

Please contact me this week for the supply list. As with all Use It Up classes, you bring the supplies. You use up the paper and embellishments in your stash and make great gifts or keepsakes at an affordable price.

Date: Sunday, May 17th
Time: 2 - 5 p.m.
Location: Hurst, TX
Class Fee: $5

Wednesday, May 6, 2009

All About Inks


ALL ABOUT INKS

Inks can be divided into three basic types: dye-based, pigment and solvent. Each type of ink has its strengths. There is not one type of ink that works for every stamping technique.

Dye-Based Inks are the most commonly used inks for rubber stamping. Because they are water soluble, they are easy to blend and use for watercoloring techniques. They dry quickly and can be used on all types of paper including glossy paper. These inks usually come on felt pads that can be re-inked easily. Stampin’ Up! Classic inks are dye-based. Basic Black, Basic Brown and Basic Gray are different from the other Classic inks. Once they dry, they are not water-soluble.

Pigment-Based Inks are opaque and dry more slowly than dye-based inks, pigments. This makes them a great choice for embossing. The color is more fade resistant than dye-based inks. Pigment inks usually come on foam pads and the thickness of the ink makes it slightly more difficult to re-ink the pad. When using a foam pad, it’s important to remember to tap lightly when inking your stamp since the pad is more flexible than felt. The Stampin’ Up! Craft inks are pigment inks.
Versamark is a type of clear pigment ink. In addition to being used for embossing, it also leaves a watermark on many different types of paper for a subtle background technique.

The Encore metallic inks are also a type of pigment ink.

Solvent-Based Inks use one or a combination of solvents instead of water as the liquid part of the ink. They dry quickly which is why they usually come with an inner lid for the inkpad. Solvent inks are not water soluble and can be used on many non-porous surfaces such as glass, plastic, transparencies and shrink plastic. They are great for stamping line images that you will watercolor in since the ink won’t run when wet with water. While solvent-based inks may be sold as “permanent” inks, they can often be removed with rubbing alcohol. StazOn inks, alcohol inks and Sharpie pens are all different types of solvent-based inks.

Stamp Cleaners. Different types of inks can also require different types of cleaners. Stampin’ Mist is excellent for cleaning Classic and Craft inks. StazOn All Purpose Cleaner works well for all of the inks sold by Stampin’ Up! including StazOn, Basic Black, Basic Brown and Basic Gray.

Ink Refills. Stampin’ Up! sells ink refills that can be used to re-ink your inkpads. This is more cost effective than buying a new inkpad.

Was this information helpful? Please leave a comment and let me know.

Sharon Cheng
www.sharoncheng.stampinup.net
http://scandcompany.blogspot.com/

Butterfly Garden Explosion Box


I had such a great time creating this Butterfly Garden Explosion Box. When you take the lid off of the box, you get an unexpected surprise--a garden filled with flowers and butterflies.


Learn how to make this box including the technique for making it look like the butterflies are floating above the flowers. They also flutter in a gentle breeze.

Date: Friday, May 29th
Time: 6:30 to 8:30 p.m.
Place: Bedford, TX
Class Fee: $20 includes all supplies except adhesive

To register for this class, please contact me at cheng1170@sbcglobal.net.

Sharon Cheng
Richland Hills, TX

Tuesday, May 5, 2009

May Stampin' Up! Promotions


I made this card to show some of the Walk in the Park Designer Series Paper in the Occasions mini catalog. There are three different promotions to celebrate National Scrapbooking Month.

1. Buy three packs of Designer Series paper (including our Specialty Designer Series paper) or 12" x 12" textured card stock, and get a 4th one FREE!

2. Buy a sneak peek stamp set from the 2009-2010 Idea Book & Catalog--Jumble Alphabet (set of 52; double-mounted)--at a 20 percent discount.

115199 Jumble Alphabet stamp set Sale Price $35.16

3. Join Stampin' Up! as a demonstrator for only $75 with our limited-time Scrapbooking Starter Kit. The Scrapbooking Starter Kit contains the following:
113510 Schoolbook Serif Alphabet stamp set* $42.95
113059 Simply Scrappin' Petal Party $19.95
108697 Earth Elements Assorted textured card stock (12" x 12") $11.95
105240 Whisper White Craft Stampin' Pad $7.50
*Substitutable for any stamp set up to $43.95 value.

Please contact me at cheng1170@sbcglobal.net for more information about any of these specials.

Sharon Cheng

Saturday, April 11, 2009

Get Connected Promotion


I wanted to use several of my new toys from Stampin' Up! and this is the card I ended up making. It uses the Manhattan Flower Texturized Impressions Die, Great Friends, Oval All and the Scallop Oval Punch. You can barely see the Walk in the Park Designer Series paper behind the Vellum cardstock.

With the Get Connected promotion, when you purchase $40 from the Occasions mini catalog, you can select one item from the under $10 group on page 208. Check out the promotion details on my website.

Sharon Cheng
Richland Hills, TX
www.sharoncheng.stampinup.net

Saturday, April 4, 2009

All About Adhesives


With so many adhesives available, how do you know which ones to choose? It depends. There isn’t one product that works for everything.

Do you prefer a dry or wet adhesive? The advantage of dry adhesives is that they are usually easier to apply without making a mess. The advantage of wet adhesives is that they can be more versatile.

Both the 2 way glue pen and Mono Multi can be used as permanent or removable adhesives. If you attach your items when the glue is still wet, it will be permanent. If you let the glue dry first, it becomes a removable adhesive.

You can make a dry adhesive like SNAIL removable. Put the SNAIL down on your first piece of paper. Then stick it on your clothing multiple times to pick up a little lint. When you attach it to your object, you'll find that it is removable thanks to the lint.

Here's a summary that I created with more information about my favorite uses for different Stampin' Up! adhesives.

Crystal Effects
Type: Wet
Permanent
Can be used to attach metal to paper
May discolor ribbon if used to attach ribbon to paper
My personal fav for adding glossy decorative effects, can be dyed with reinkers, you can use it with Dazzling Diamonds to make your own Stickles

Dimensionals
Type: Dry
Permanent*
Not recommended for attaching metal to paper
Not recommended for attaching ribbon to paper
My personal fav for giving extra dimension to a project

Glue Stick
Type: Wet
Permanent
Not recommended for attaching metal to paper
Not recommended for attaching ribbon to paper
My personal fav for attaching paper to chipboard, it covers the best and gives the smoothest finish

Mini Glue Dots
Type: Dry
Permanent
Can be used to attach metal to paper
Can be used to attach ribbon to paper
My personal fav for attaching ribbons, adhering small metal objects to paper

Mono Multi
Type: Wet
Permanent/Removable**
Can be used to attach metal to paper
May discolor ribbon if used to attach ribbon to paper
My personal fav for attaching little things

SNAIL
Type: Dry
Permanent*
Not recommended for attaching metal to paper
Can be used to attach ribbon to paper
My personal fav for a quick, easy adhesive, doesn't work well in humid climates.

Sticky Strip
Type: Dry
Permanent
Can be used to attach metal to paper
Can be used to attach ribbon to paper
Covers more area than a mini glue dot, can be a little difficult to remove the red plastic covering

Two-Way Glue Pen
Type: Wet
Permanent/Removable**
Not recommended for attaching metal to paper
May discolor ribbon if used to attach ribbon to paper
My personal fav for adding glitter and attaching little things

*While these products are sold as permanent adhesives, they can be removed carefully with an adhesive remover
**If you attach the paper when the glue is wet, it is permanent. If you wait until the glue dries, before attaching the paper, it is removable.

Thursday, March 26, 2009

SU Rocks!!!


I'm currently in Hawaii on Stampin' Up!'s incentive trip that I earned last year. We're at the Hilton Waikoloa Village on Hawaii's Big Island. We're on the Kona side which has a lot of areas covered with black lava. The locals call it Hawaiian graffiti when people use the white coral rocks to "write" on the black lava. Naturally, someone had to put SU's name on the lava rocks at the resort. And by the way, this type of graffiti is legal!

Check out more of my photos on Facebook.