Home Classes Tutorials Online Store Join
Showing posts with label Halloween. Show all posts

Thursday, October 1, 2015

Among the Branches Halloween


One of the most versatile stamp sets in Stampin' Up!'s Holiday Catalog is Among the Branches.  You can use it for Halloween, Fall, Christmas and winter.  I used it to make three Halloween projects for a Splitcoaststampers challenge.


I was inspired by a paper sack luminaria and a project I saw at Inspire, Create, Share 2015 to make this mini luminaria.  At Stampin' Up!'s convention, they showed us how to make the Sketched Dots Gift Bag look like candy corn by using Daffodil Delight and Pumpkin Pie Classic Ink Pads.  The colors are added by patting the ink pad directly onto the bag.  You will need to mask the bag to keep the stripes straight.

After sponging on the color, score 1" along the 3 closed sides of the bag.  You then fold them to make a bag that stands up.  I did add a 2 3/4" x 2" piece of cardstock at the bottom of the bag to hold the shape.  If you like the spider web doily, be sure to order it right away to get it before Halloween.  They have already sold out several times.  Add a battery-operated candle and you have a fun mini luminaria.


You can use the same spider web doily to decorate this quick and easy Spooky card.  I got the idea to stamp the eyes on this bold striped paper from Timeless Elegance after making this card.


This card also uses the Woodland embossing folder and Happy Haunting Designer Series Paper.  After running a piece of Very Vanilla cardstock through the embossing folder, I used a sponge dauber to add a little color to the tree trunks.

I hope you have fun making your Halloween projects.  Remember to visit the Splitcoaststampers Gallery for more Halloween inspiration.  Here are all of my October Splitcoaststampers Challenges.
Built for Free Using: My Stampin Blog
Visit my online store to get what you want for your next project.  Remember that when you purchase $25 or more in product, you are eligible for my Rewards Program.

Creatively yours,

Sharon Cheng
Richland Hills, TX
My Online Store

October Splitcoaststampers Challenges


This is the first card that I made for the October Splitcoaststampers Challenges.  The challenge was to use Black, White and Red (or read) for your project.  This card uses the A World of Thanks stamp set (139315  $15).


The next challenge was to use a "print" from designer series paper or stamped images.  I decided to combine the color and print challenges to make these three cards.  You can get more details about how I used Stampin' Up!'s Timeless Elegance Designers Series Paper to make all three cards.  The paper uses Basic Black, Sahara Sand and Very Vanilla.  It's quick and easy to add accent colors of your choice.


The front page challenge was very different for me and I ended up loving this page. It features my group, Sharing Creativity and Company at Awards Night at Inspire, Create, Share 2015. Here are more details about how I created this page using Microsoft Word.


And last, but not least, are making Halloween projects!  Here is my mini luminaria.  See how I made this and other Halloween projects using Stampin' Up!'s Among the Branches Stamp Set.

Visit my online store to get what you want for your next project.  Remember that when you purchase $25 or more in product, you are eligible for my Rewards Program.

Creatively yours,

Sharon Cheng
Richland Hills, TX
My Online Store

Tuesday, September 1, 2015

Splitcoaststampers Creative Crew September Challenges


I am so excited to share the Christmas projects I've been making for the September Creative Crew gallery.  This Christmas tag with a punch art tree fits two of the challenges:  DSP/Color Focus and
Holiday Focus.  For the color focus challenge, I was supposed to pick my favorite designer series paper in Stampin' Up!'s Holiday catalog.  I could not decide between Season of Cheer and Home for Christmas, so I used both of them!  Home for Christmas has several images that are perfect for punching out single images or fussy cutting.  Season of Cheer is more user friendly for cutting up into strips or punching out repetitive designs.  Check out my tutorial for making this Christmas tag and visit the Splitcoaststampers gallery for more Christmas inspiration.


Another challenge was to feature one of the gift packaging ideas on pages 150 and 151 in Stampin' Up!'s annual catalog.  I made this Snow Place gift bag using the Gift Bag Punch Board.  See how I used punches and framelits to make this Snow Place gift bag go quickly for a demonstrator swap!


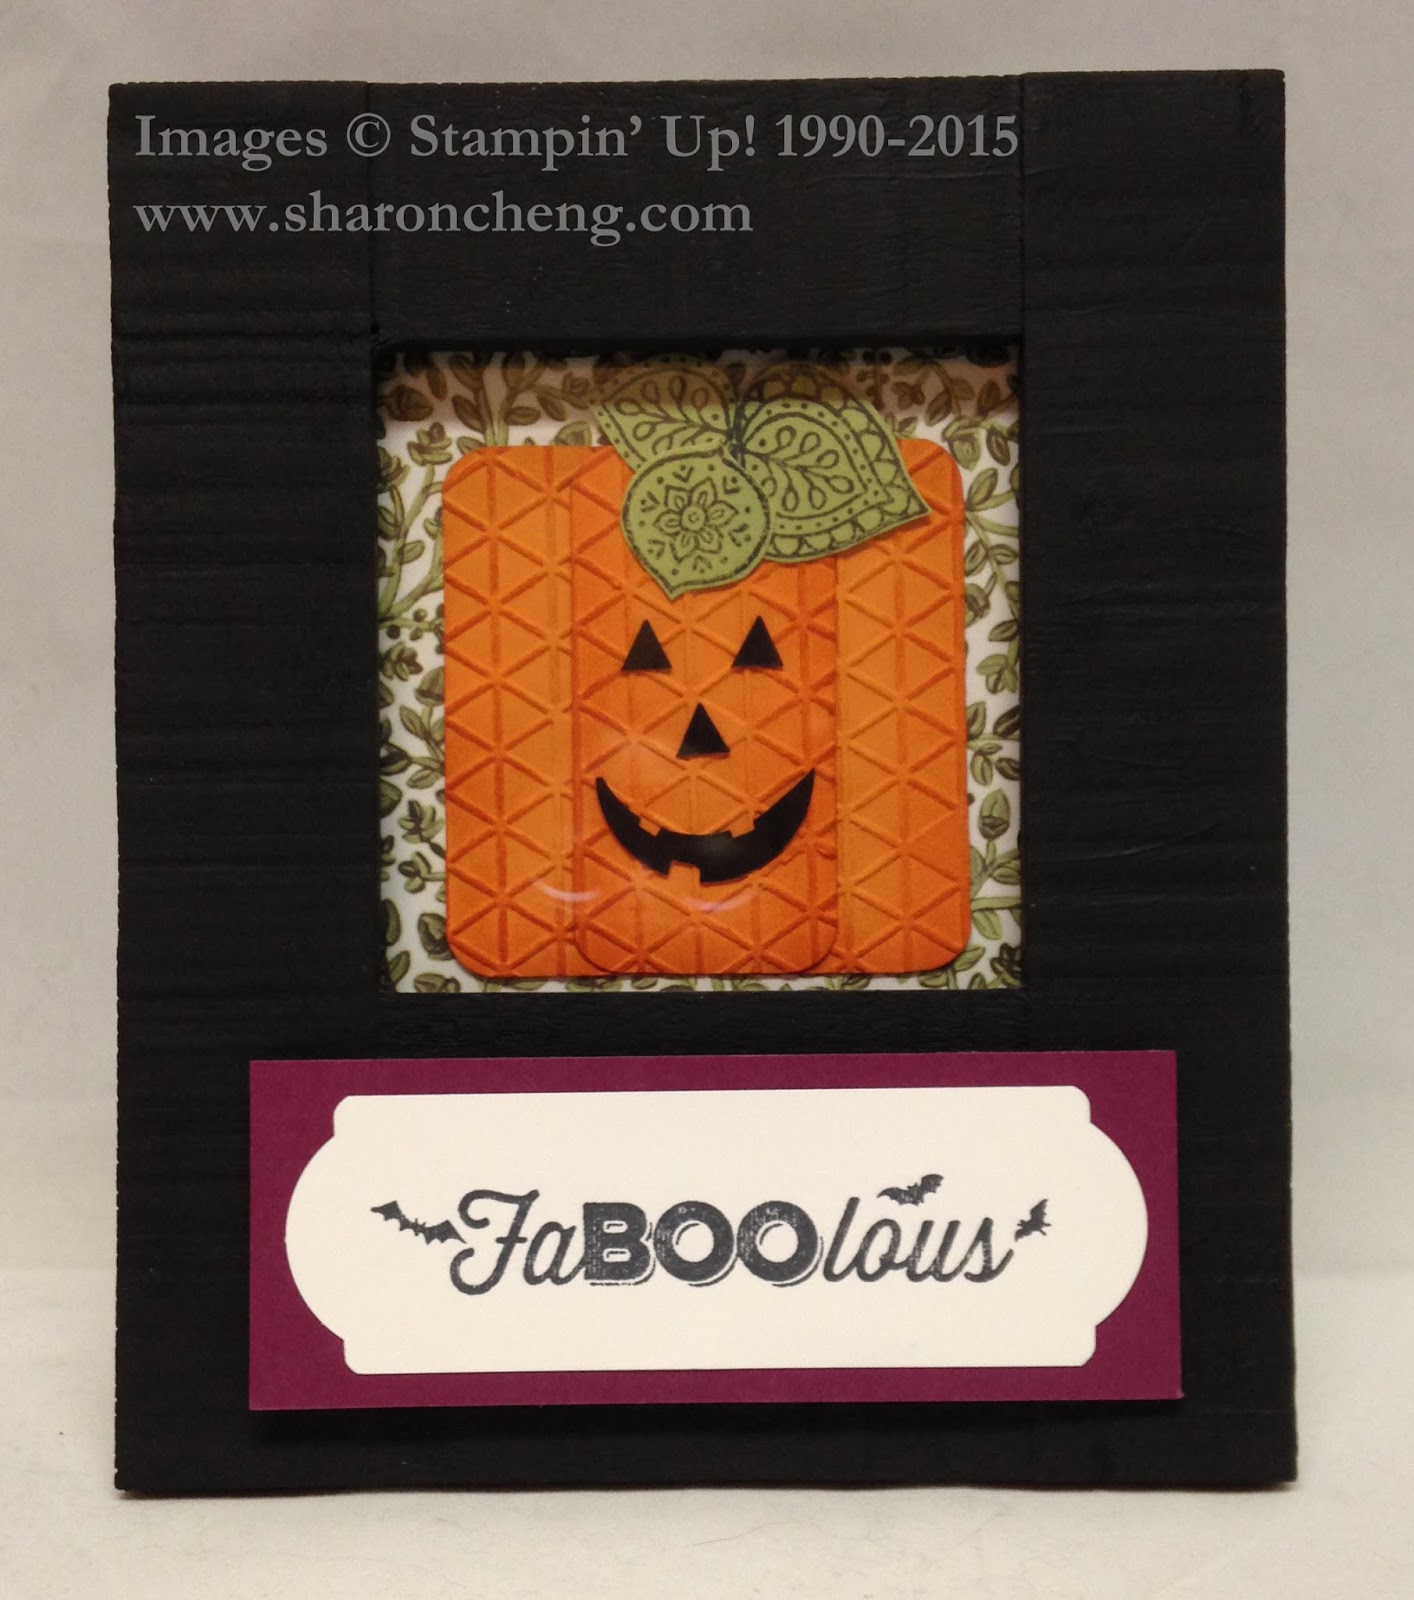
This Holiday Frame is a fun project that I designed for Halloween, Thanksgiving and Christmas for the Splitcoast challenge to make a gift item.  By changing the insert and the labels, you use one frame for all three holidays.  Check out how I used window sheets and magnets to make changing out the Holiday Frame quick and easy.
Built for Free Using: My Stampin Blog

Visit my online store to get what you want for your next project.  Remember that when you purchase $25 or more in product, you are eligible for my Rewards Program.

Creatively yours,

Sharon Cheng
Richland Hills, TX
My Online Store

Quick and Easy Holiday Frame


This quick and easy Holiday Frame is designed to fit many different holidays, including Halloween, Thanksgiving and Christmas.  You only need one frame and some magnets to make changing things for each holiday easy peasy.  Stampin' Up!'s Hostess Stamp Set, Six Sayings (139849 $11), is perfect for this project.


Here is the Thanksgiving version.


Notice that the pumpkin is the same for Halloween and Thanksgiving?  All I did to turn it into a jack-o-lantern was to add the window sheet with the face.  The small pieces are easy to stick onto the window sheet using Stampin' Up!'s new Fine-Tip Glue Pen.

If you look closely, you can see the magnetic strip on the bottom of the frame.   I also have magnets on the back of each label so they are easy to change for each holiday.


Here is how I used the Note Tag Punch to punch each end of the Halloween label.  For Thanksgiving, I used the Chalk Talk Framelits.


For Christmas, I used the Ornate Tag Topper and Banner Triple Punch.

Have fun making your Holiday Frame to fit your favorite holidays.  And stay tuned for future projects using this same frame.

See more Christmas and Holiday projects that I made for the Splitcoaststampers Creative Crew September gallery.
Built for Free Using: My Stampin Blog

Visit my online store to get what you want for your next project.  Remember that when you purchase $25 or more in product, you are eligible for my Rewards Program.

Creatively yours,

Sharon Cheng
Richland Hills, TX
My Online Store

Tuesday, July 29, 2014

Holiday Catalog Sneak Peek Halloween


In addition to Christmas, Stampin' Up!'s Holiday catalog also has what you need for Halloween, Fall and Thanksgiving decorating and gift giving.  All this week I'm sharing memories from Inspire, Create, Share 2014, Stampin' Up!'s convention. 


After a product is demonstrated in a general session, there is often a Prize Patrol right after where many lucky demonstrators will get what was just demonstrated.  Sara Douglas, Shelli's daughter, demonstrated different ways to use several of the kits in the Holiday catalog.  Cindy Peterson won the Frightful Wreath Simply Created Kit after Sara's presentation.  She looks like a happy winner!


This is the variation that Sara did with the kit.  She used the leftovers to make cards and treat bags.


You can buy items from Stampin' Up!'s Holiday catalog starting August 28.  Are you in the US and would you like a copy of the catalog?  Contact me today to get your free Holiday catalog!

Check back all this week for more Inspire Create Share 2014 projects including Christmas packaging ideas from the Holiday catalog.

Visit my online store to get what you want for your next project.  Remember that when you purchase $25 or more in product, you are eligible for my Rewards Program.

Creatively yours,

Sharon Cheng
Richland Hills, TX
My Online Store

Sunday, October 13, 2013

More Halloween Fun


There are so many fun Halloween projects this year!   Here is a Halloween card that I CASEd (Copy And Share Everything).  Naturally, I usually have to "cheng" things up a little.  In this case, I added the Tangerine Tango mat.  Stampin' Up's Witches' Brew Designer Washi Tape (132156  $4.95) makes this a quick and easy card.  Hmm, I might have to see if I can come up with a Christmas version.  I love harlequin diamond designs and the label stamp from the Halloween Bash stamp set (130580  $15.95) will work with other projects too.


At our Stampin' Up! demonstrator meeting, Janet Holmes shared this Spooky Bat Halloween party favor that she made.  The wings are made from a large circle cut in half.  Janet used a circle punch to shape the bottom edges of the bat wings.


To cover up where the wings are attached on the back, Janet used the Bats About You stamp from Stampin' Up!'s Halloween Hello Stamp Set (131721  $14.95).  How cute is that!

Here are some other Halloween-related posts on my blog. 

Pumpkin, Pirate and Pilgrim Owls

These little owls are ready for to party for Halloween!  This has been a popular Pinterest pin!


 Coffee Filter Jack-O-Lantern

This pumpkin is made using coffee filter paper. 
 Halloween Quick and Easy Favors

This style of favor is so popular and can be made to fit all different occasions.


Halloween Happiness

This was one of my Stampin' Up! demonstrator swap cards.


Visit my online store to get your supplies for these projects.  Remember that when you purchase $25 or more in product, you are eligible for my Rewards Program.

Creatively yours,

Sharon Cheng
Richland Hills, TX
My Online Store

Tuesday, September 17, 2013

Halloween Quick and Easy Favors


Looking for some party favors ideas for your Halloween party?  At our last demonstrator meeting, we had a 3D swap.  Everybody made such cute projects!  Here are some of the Halloween ideas.  This first project was made to look like candy corn.  This was a show and tell item rather than a swap.  So cute!


Melody Smith made this candy holder.  She used the Labels framelit to die cut the holder.  She then stamped it with the Toil and Trouble stamp set  (131727  $16.95).  She stamped it again on a separate piece of paper and used Heat and Stick Powder to add the black glitter.  She cut out the different images and added them to the holder.  This added some wonderful accents.


Janet Holmes made this quick and easy lollipop cover.  In addition to being a fast project that you could do with the family, it also makes a wonderful display with all of the lollipops lined up in rows.  She used the Halloween Hello stamp set (131721  $14.95).


This project comes from the Stampin' Up! design team.  It also uses the Halloween Hello stamp set (131721  $14.95) along with the Witches Brew Designer Series Paper (132185  $10.95).


At our last stamp club meeting, we made these party favors with Stampin' Up!'s Pumpkin Pie Goodie Gear Simply Created Kit  (132792  $4.95 for 10 favors).  This was by far the fastest and easiest way to make favors if you have a lot of little gifts to make and not a lot of time.  
 
Visit my online store to get your supplies for these Halloween projects.  Remember that when you purchase $25 or more in product, you are eligible for my Rewards Program. 

When you make your online purchase by Saturday, 9/21, and use hostess code AG6Z4P3N , I'll put your name in a drawing for hostess rewards.

Have fun getting ready for your Halloween festivities!

Creatively yours,

Sharon Cheng
Richland Hills, TX
My Online Store

Saturday, July 27, 2013

Halloween Happiness


This card features two items from the upcoming Holiday catalog, the Halloween Happiness and Magnificent Maple stamps.  It also uses two designer series paper which are on special through July 31st, Modern Medley and Polka Dot Parade. 

I cut the sentiment off from the Halloween Happiness stamp to make room for the Polka Dot Parade Designer Series Paper trim.  It's the same technique that I used for this Ears to You card.  With Stampin' Up!'s clear mount stamps, it's easy to separate the sentiment from the image.  Then you can use them together or apart to give a fresh look to your projects.

I used Pumpkin Pie, Old Olive and Rich Razzleberry markers to ink the image and stamped everything at one time.  Then I added the Polka Dot Parade trim.


You may have already noticed that Modern Medley is my favorite Stampin' Up! designer series paper right now.  I like black and white prints because they are so versatile.  To add a little color, you simply sponge on the paper.  You can see where I added Coastal Cabana to the Modern Medley paper for this project.  It marries or unifies the colors for this jar.

Stampin' Supplies

Item Description Price
131859 Halloween Happiness (available 8/1) $9.95
131868 Magnificent Maple (available 8/1) $9.95
126926 Modern Medley Designer Series Paper $10.95
126902 Polka Dot Parade Designer Series Paper $10.95

Visit my online store to get your supplies for this project.  The two stamps are in the Holiday catalog which will be available on August 1, 2013.  Remember that when you purchase $25 or more in product, you are eligible for my Rewards Program.

Creatively yours,

Sharon Cheng
Richland Hills, TX
My Online Store

Wednesday, October 10, 2012

Pumpkin, Pirate and Pilgrim Owl Punch Art


Stampin' Up!'s owl punch is one of the most versatile punches. For Halloween and Thanksgiving, I made  these three owls. Here are my pumpkin, pirate and pilgrim owls.


Here is a close-up of the owls on my Halloween card.


The pilgrim owl uses the cupcake punch to make the crown of the hat.


I also tried a new type of card.  Here is how the card looks when it is open.


To make the card, I cut a piece of card stock to 4  1/4" x 10  3/4".  From the left hand side, score at 1  3/4" and 6  1/4".  Use the 1  3/4" circle punch to punch the hole at the top.

I'm giving a more detailed tutorial to anyone who makes a purchase through my online store before November 1, 2012.  You get more details on how I made both cards including the pumpkin, pirate and pilgrim owl.  Place a minimum of a $25 order to get credit toward a free stamp set through my Rewards Program.

Here are more projects you can make using the owl punch.  

Creatively yours,

Sharon Cheng
Richland Hills, TX
My Online Store

Thursday, October 6, 2011

Halloween Display and More

I LOVE Stampin' Up!'s silver glimmer paper.    It's so easy to cut, punch and die cut.  And it adds a little bling to your projects.  I used it in this project which also features the Gift Givers stamp set and Pick Your Poison Designer Series Paper.

What I also like about this project is that you can change out the Halloween tag to fit other occasions.  You can see some of the other tags throughout this post.

This display block is a great way to show your hand crafted  work in your home.  Some of the techniques used in these tags include dry embossing, wax paper resist, making a dahlia fold cross, and making a rosette.


Another fun thing is this is a green project that recycles the wood blocks from my stamps.  Many of you know that I've been converting my wood mount stamps to clear mounts.  Click here to see the details on my July 6, 2010 post. 

I've made several different projects using the wood blocks and wanted to do something special with the large wood blocks from my background stamps. 


To get more information about any of the techniques I used for these tags, please contact me at sharon@sharoncheng.com or leave a comment on this blog.

Visit my online store to get your supplies for this project.  Remember that when you purchase $25 or more in product, you are eligible for my Rewards Program.

Creatively yours,

Sharon Cheng
Richland Hills, TX
My Online Store