The picture tutorial for making these quick and easy Envelope Favors using Stampin' Up!'s Envelope Punch Board from a 5 x 5 in. square of paper has been so popular that I decided to make a video tutorial. Here are some of the favors I have made including the Christmas one from my original post. The tutorial in that postalso shows how to make the bow using the large oval punch. Many thanks to those of you who pinned that tutorial on your Pinterest board.
In addition to the instructions for making your envelope favor, this video also shows you how to make a small bow using the envelope punch board.
Shop with me through my online store to get your supplies for this project. Remember that when you purchase $25 or more in product, you are eligible for my Rewards Program.
The Good as Gold card kit has ended up being one of the most versatile products that Stampin' Up! is offering during Sale-A-Bration. Today, March 31st, is the LAST day to earn the Good as Gold card kit. I wanted to share some of the ways that my friends have been using this kit. The first card shows how the kit was originally designed to be used. Look how shiny the gold foil is!
All of these cards were made by my demonstrator friend, Christa Halsbema in the Netherlands. Sale-A-Bration is a world-wide event! I love how she used the printed card stock and gold foil envelope liners as embellishments.
Janet Holmes made this treat box using one of the note cards in the kit.
Enjoy the last day of Sale-A-Bration by shopping with me through my online store and get your supplies for these projects. Remember that when you purchase $25 or more in product, you are eligible for my Rewards Program.
Monday, March 31st is the last day for Sale-A-Bration 2014. Here are some projects featuring Sale-A-Bration products. You can click on the description to go to the original post. For every $50 you spend, you can choose a Sale-A-Bration item for free!
I hope you enjoyed seeing different ways to use Stampin' Up!'s Sale-A-Bration products. Visit my online store to get your supplies for these projects. Remember that when you purchase $25 or more in product, you are eligible for my Rewards Program.
This Punch Art Easter Bunny has inspired even more projects, including this card with coordinating lined envelope. After making the tutorial and video for the Punch Art Easter bunny, I had the extra parts to make the Easter card. The card was so cute, I just had to make the coordinating lined envelope.
This video will show you how to make the liner along with instructions for figuring out how much paper to use and how to attach the liner so the envelope opens and closes easily. You can also see my picture tutorial for how to make a coordinating lined envelope that I posted earlier.
Here is a quick 6 x 6 layout that could easily be added to a larger scrapbook page.
Visit my online store to get your supplies for this project. Remember that when you purchase $25 or more in product, you are eligible for my Rewards Program.
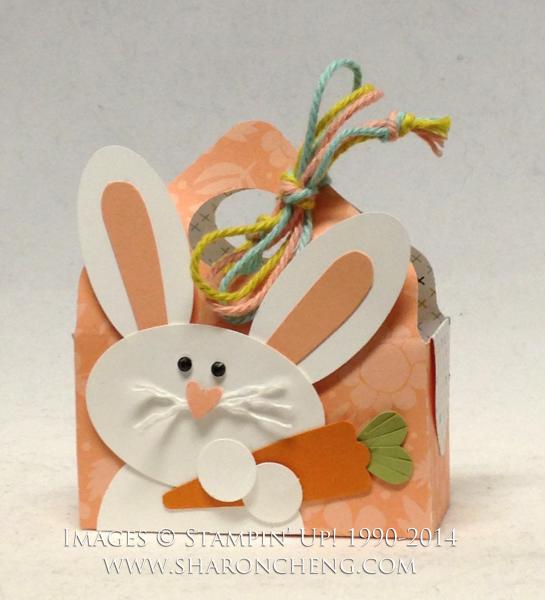
You can use Stampin' Up!'s Envelope Punch Board (133774 $19.95) to make this basket for Easter or other occasions when you want your friends to ooh and aah about how crafty you are! As promised, this is Part 2 of my Punch Art Easter Bunny Basket. While Part 1 shows you how to make the Easter Bunny, this post will focus on making the basket.
Have you ever tried to copy something, goofed it up and then ended up with your very own original design? At our last demonstrator swap, Christi Beck made a cute Easter basket. When she said that it only took a 6 x 6" piece of designer series paper, I knew I had to try it. Silly me, I thought that I could measure her basket and figure out where to punch and score. Wrong! Thankfully, the basket I made worked out, so yippee skippee. I had a pottery instructor who called it "serendipity" when you accidentally created something that you really liked even though it wasn't what you originally had in mind. LOL!
For this basket, you might find it easier to follow the video. However, if you have made these types of baskets before, here are the measurements.
Start with a 6 x 6" piece of designer series paper. Punch and score on the first side at 1 1/4" and 3 3/4". Follow the score marks to punch and score on the remaining 3 sides. Round all 4 corners.
Cut to the fold on both sides of the wide tabs.
Use the small oval punch (120908 $12.95)to make the handles. Attach the Punch Art Easter Bunny or any other embellishments while the basket is still flat. Then adhere to form the basket. This is where it might be easier to watch the video.
I'll be posting other videos with different ways to use Stampin' Up!'s Envelope Punch Board.Subscribe to my YouTube Channel to catch the Envelope Punch Board series as the new videos are finished. You'll impress your friends with how many things you can make with this one tool.
Visit my online store to get your supplies for this project. Remember that when you purchase $25 or more in product, you are eligible for my Rewards Program.
Creatively yours,
This punch art Easter Bunny Basket will make your treats the hit of your Easter celebration. The project was inspired by mashing up two different projects.
At our March Stampin' Up! demonstrator meeting, Christi Beck made this Easter basket as a swap.
While looking for some Easter inspiration, I found thispunch art bunny that I believe is from Portugal based on Google translate.
My friends know that I'm not very good at copying things exactly. The good news is that those mistakes sometimes turn out better than expected! I'll share more about how that happened with the basket in my next post. LOL.
As for the Easter bunny, I used Stampin' Up! punches and my stamp club members liked making the project. I had originally tried drawing the whiskers and found that I couldn't get consistent results. That is why I decided to use baker's twine. You can see the technique in my video.
Visit my online store to get your supplies for this project. Remember that when you purchase $25 or more in product, you are eligible for my Rewards Program.
This Punch Art Easter Chick is quick and easy to make using Stampin' Up!'s Scalloped Tag Topper Punch.
From So Saffron card stock, punch a 1 3/4" scallop circle. Cut a piece that is 2 x 5 1/2". Score at 2 5/8 and 2 7/8".
From Whisper White card stock, cut a piece that is 4 1/4 x 3/4". Score at 7/8, 1 1/8, 3 1/8 and 3 3/8".
Cut a 5 1/2" piece of Whisper White Stitched Grosgrain Ribbon.
Punch both ends of the 2 x 5 1/2" So Saffron card stock using the Scalloped Tag Topper Punch. Cut the scallop circle in half to form two wings. Sponge all three pieces with Pumpkin Pie. Attach the wings to the chick's body.
Tie a loop in the ribon. Thread the long end through the slots and snug up the ribbon.
Punch a triangle for the beak out of Pumpkin Pie card stock.
Stamp "Happy Easter" (from the Delightful Dozen stamp set) on the Whisper White card stock. Cut both ends (details are on the video). Fold on the score lines. Attach the banner to the Easter Chick and add your chocolate!
Here is my first Sharing Creativity and Company video! It took a village of people to help me with this first video. Many thanks to Kip Critchlow for encouraging me to get it done and reminding me that it didn't have to be perfect. Christi Beck and Terry Stahl (my sister) for patiently answering my many questions about how to make a video and get it uploaded to YouTube. The video has several quick and easy tips that my Stampin' Up! customers have asked me to put on a video including sponging, tying a ribbon and cutting a pennant or flag end.
Visit my online store to get your supplies for this project. Remember that when you purchase $25 or more in product, you are eligible for my Rewards Program.
And I'm offering an extra special through March 31, 2014. If you place an online order for $25 or more, I'll send you one of my Easter chicks. And this is the last month for Sale-A-Bration. Place an online order for $50 or more and you can select a free Sale-A-Bration item!