Home Classes Tutorials Online Store Join

Saturday, March 9, 2013

Best of Flowers Swan Card


This swan card was inspired by an ugly duckling card that I transformed using Stampin' Up!'s Best of Flower stamp set.  At our March demonstrator meeting, we were discussing different swaps we could do as a group.  I suggested a swan card swap.


If you remember the story written by Hans Christian Anderson, the ugly duckling was a homely little bird with no friends who eventually matures into a beautiful swan.  When we swap cards it is human nature to like some cards more than others.  And some cards would not pass by the "card police" without getting a ticket!

Our group believes you should swap with anyone who asks even if you don't feel like the card is "swap-worthy".  To encourage swapping, I thought it would be fun to do a swan card swap.  The challenge is to take a card that needs help and work with it until it becomes a swan card.  Of course, for our small group, the other part of the challenge is that the maker of the ugly duckling card must remain anonymous unless it is you.  It's always fun to see a beautiful swap card and what inspired it!


I loved this card when I made it.  The problem?  I thought it was the image that would be coming in the Best of Flowers stamp set. I decided to get a head start since I had the retired stamp set, Just Because.  It's a good thing no one saw the look on my face when I opened my Stampin' Up! box and saw the actual stamp set.


Not only was the image of the hydrangea different, it was a completely different size.  AAAAAKKKK!!!

Having just talked about swan cards at our demonstrator meeting, this problem became my first ugly duckling card challenge.  While the card wasn't ugly to me, using a retired image that wasn't in the Best of Flowers set was a big problem!

I decided to keep the same size card stock and dye the ribbon as I had in my original card. With the smaller hydrangea, I was able to use a larger sentiment.


To be sure that things lined up, I put both stamps on the same clear block.  That way they were both lined up on the Very Vanilla card stock.

The good news about this swan card is that the tutorial is basically the same.  The difference is that I only used the sponge dauber for the first layer of Baja Breeze due to the smaller size of the hydrangea.  This card actually goes a little faster because the bloom is smaller.

So remember that when you aren't happy with your next project, maybe it's a future swan just waiting for the right inspiration. 

Stampin' Supplies for Best of Flowers Hydrangea Card

Item Description Price
133342 Best of Flowers Stamp Set $14.95
121970 Pursuit of Happiness Stamp Set $13.95
129399 Paper Doilies (24 in pkg) $2.95
122331 Baja Breeze Seam Binding Ribbon $6.95
102892 Sponge Daubers (12) $10.95
102845 Blender Pens (3)  $9.95

Visit my online store to get your supplies for this project.  Remember that when you purchase $25 or more in product, you are eligible for my Rewards Program.

Sale-A-Bration goes through March 22nd.  When you purchase $50 in products, you can pick a free item from the Sale-A-Bration catalog.

Creatively yours,

Sharon Cheng
Richland Hills, TX
My Online Store

Thursday, March 7, 2013

Best of Flowers Tutorial


You will be surprised at how quickly you can color the hydrangea flower from Stampin' Up!'s Best of Flower stamp set using sponge daubers and blender pens with this tutorial.  The key to success is to use a light touch and to remember that you can always go darker, but you can't go lighter.  Don't try to get all of the dark areas filled in at the beginning.  You can always go back and add more color.

Note:  This hydrangea is from the retired Stampin' Up! hostess stamp set, Just Because.  Find out more about how I got my images mixed up and see the REAL Best of Flowers Hydrangea card.  The good good news is the the tutorial works for both cards.

Here are the sizes for the card stock.

Very Vanilla:  2 5/8" x 3 7/8" (You know how I love those thin mats!)
Early Espresso:  2 3/4" by 4"
Perfect Plum:  8 1/2" x 5 1/2"

Stamp the flower on the Very Vanilla card stock with Early Espresso and set it aside to dry for at least 20 minutes.  You want the ink to be completely dry before you start adding other colors with the sponge daubers and blender pens.  Remember to use a light hand.  You aren't trying to "scrub in" the colors on the paper.  You're putting them on lightly like you would put make up on your face. If you have a heavy hand, try embossing the flower with Early Espresso embossing powder on watercolor paper.  That will make it easier to blend Baja Breeze, Rich Razzleberry, Old Olive and Perfect Plum while leaving all of the details of the flower in Early Espresso.


This picture shows the four steps to color in the hydrangea. Click on the picture for a close up view.

1. Use a sponge dauber to add Baja Breeze.  Notice that I didn't color in anything solidly.  You want the colors to blend just like they do in a real hydrangea. 

2.  Use a sponge dauber to add Rich Razzleberry.  Use a light hand!

3.  Use a blender pen to add Old Olive to the leaves and small areas of the flower.

4.  Use a blender pen to add Rich Razzleberry and Perfect Plum to the outer edges of the flower.


To color the ribbon, dampen the Baja Breeze Seam Binding ribbon with water.  Use the sponge dauber to brush on Old Olive and Rich Razzleberry in different places on the ribbon.  Be sure to allow some of the Baja Breeze to show.  To attach the ribbon, I put a strip of snail directly on the Very Vanilla card stock and scrunch the ribbon as I stick it to the card stock.

While you can use any sentiment, I used "Just for You" from the Pop-Up Posies Designer Kit. I also cut one of our paper doilies into 4 pieces and used two of them for this card.

Revisiting some cards from the first time around...


I really liked this image the first time when it was in the hostess set, Just Because.  Here are some of the cards I made or received in swaps back in 2010 and 2011.  While some of the elements are retired, you can see how versatile this hydrangea can be.  For this first card, I used pastel chalks to get the soft colors.  You could get a similar effect by coloring directly on the stamp with Stampin' Up!'s Watercolor Wonder Crayons, spritzing it with water and then stamping on card stock.


I loved this card that I received in a swap from Gail Yanker and CASEd it for a class.  River Rock and Basic Black make a stunning color combination.


Here's another card I made where I used the hydrangea for the focal point and the background.


I CASEd this card made by Marilyn Young.  She made the background by using a clear acrylic mount.  She stamped the block on the ink pad and then on the card stock.  With our new firm foam ink pads, you may have to stamp off once on a scrap piece of paper before stamping on the card stock. 


Here are all of the images in the Best of Flowers stamp set.  I'm glad that Stampin' Up! is celebrating its 25th Anniversary in such a fun way by bringing back some great images along with new ones.  The flower on the lower right can be punched out with our 1 1/4" Scallop Circle Punch.  I hope you've enjoyed this trip down memory lane along with the tutorial for my new card.

Stampin' Supplies for Just For You Card

Item Description Price
133342 Best of Flowers $14.95
131395 Pop-Up Posies Designer Kit $12.95
119855 Large Oval Punch $15.95
119856 Scallop Oval Punch $16.95
129399 Paper Doilies (24 in pkg) $2.95
122331 Baja Breeze Seam Binding Ribbon $6.95

Visit my online store to get your supplies for this project.  Remember that when you purchase $25 or more in product, you are eligible for my Rewards Program.

Sale-A-Bration goes through March 22nd.  When you purchase $50 in products, you can pick a free item from the Sale-A-Bration catalog.

Creatively yours,

Sharon Cheng
Richland Hills, TX
My Online Store

Wednesday, March 6, 2013

Paper Pumpkin Monthly Kits


Paper Pumpkin by Stampin' Up! is a new monthly kit program that anyone (even you) can enjoy! It comes in a sweet box, but you'll really love what you find on the inside:  All the stamps, ink, paper, and accessories to create pinable projects. Create stuff like cards, journals, décor, and more!


It's so easy to get started. Simply sign up for the program by visiting www.mypaperpumpkin.com and click Get it.  Every month a new, surprise project kit arrives at your doorstep. Just think of the anticipation of creating a fun project to pin, show off, and share with your friends and family-every month!

Of course, you'll want to know more. So here's the nitty gritty:
  • Each month we send you a unique, surprise kit with a project-cards, journals, décor, and more! (We've even color-coordinated, measured, and cut everything for you!)
  • Each kit includes stamps, ink, paper, and accessories-everything but adhesive.
  • Each kit gives you a 30-minute creativity escape.
  • We will ship your Paper Pumpkin on or around the 15th of the month.  
  • You need to sign up for a kit by the 10th of the month to get that month's kit. If you sign up on the 11th of the month, your first kit will come the next month. (Let's say you sign up on May 10th, we'll send your kit around May 15th. If you sign up on May 11th, we'll send your first kit around June 15th.)
  • A Paper Pumpkin membership is $19.95 per month (and shipping is included!)
  • There's no commitment, you can cancel your monthly Paper Pumpkin at anytime. You can also skip a month if you want.
  • Starting in early March, we'll offer a Try-It kit if you'd like to try Paper Pumpkin for one month.

Here's How You Order

Sign up for your monthly Paper Pumpkin by visiting www.mypaperpumpkin.com and click Get it. Please be sure to select Sharon Cheng as your demonstrator when you're asked during the registration process.

  A Free Gift in Your Very First Kit

The Welcome Kit is the very first Paper Pumpkin you will receive in your first month of membership. The Welcome Kit includes a free gift-a clear acrylic block!  This is the welcome kit we received at Stampin' Up!'s Leadership Conference.

Creatively yours,

Sharon Cheng
Richland Hills, TX
My Online Store

Thursday, February 28, 2013

Easter (and More) Clothespin Wreath


This Easter clothespin wreath can be ready for Mother's Day or Spring by changing out a few clothespins. While they take a little bit of time, these wreaths are easy to make.  Once you've covered the clothespins, you can flip them over or change some of them to be ready for a different holiday.


I made this wreath for Easter, Mother's Day and Spring.  Notice that the colors in Stampin' Up!'s Sycamore Street Designer Series Paper fit all three occasions.  The Easter banner is attached to two clothespins.  You can change them out to fit other holidays.

The Christmas version of this clothespin wreath is one of my most popular posts and has been repinned many times on Pinterest.  You can also see the Halloween and Valentine versions on the same post.

Stampin' Supplies

Item Description Price
126592 Morning Post Alphabet Stamp Set $34.95
129654 Blooming Marvelous Stamp Set SAB
127540 Sycamore Street Designer Series Paper SAB
130812 Sycamore Street Ribbon and Button Pack SAB
119851 Curly Label Punch $16.95
119855 Large Oval Punch $15.95
119856 Scallop Oval Punch $16.95
118309 Itty Bitty Shapes Punch Pack $16.95
129404 7/8 inch Scallop Circle Punch $12.95
129406 Bitty Butterfly Punch $15.95
119246 Basic Rhinestones $4.95
129324 Large Rhinestones $4.95

Visit my online store to get your supplies for this project.  When you purchase $25 or more in product, you are eligible for my Rewards Program.

Creatively yours,

Sharon Cheng
Richland Hills, TX
My Online Store

Thursday, February 21, 2013

Sealed With a Kiss Card Scrapbook Expo


This Sealed With a Kiss card is easy to make thanks to Stampin' Up!'s Blossom Petals Builder and the 7/8" Scallop Circle Punches.  Christi Beck and I decided to use this card as our Stampin' Up! Take and Make at the Scrapbook Expo at the Gaylord Texan.  It's a Take and Make because after you stamp and punch the items, you can take it home to assemble.

Here are the instructions for the card.  If you didn't get one of our kits, cut Whisper White card stock to 8 1/2" by 5 1/2" and fold.  Cut Early Espresso card stock to 2 3/4" x 4".  Cut Wisteria Wonder card stock to 2 1/2" x 3 3/4" and emboss using the honeycomb embossing folder.  The Early Espresso Bakers Twine is cut 10".  Note, Christi and I designed this card together and each cut half of the kits.  The funny thing was that she cut her Wisteria Wonder and Early Espresso a slightly different size.  So we each put our personal touch on our kits!  They look the same at the end.


Punch the kiss out of silver glimmer paper using the largest petal in the Blossom Petals Builder Punch.  When you cut a 1 1/2" strip of silver glimmer paper, you can line up the paper in the punch to make the kiss by leaving out the scalloped end of the petal.  "For You" comes from the Itty Bitty Banners stamp set and "Sealed with a Kiss" comes from the new Sent With Love stamp set.


Put your adhesive on the back, fold the bakers twine in half and fold to the back. 


When you turn it over, it will look like this.


Add adhesive to the other items, including a Stampin' Dimensional on the Sealed with a Kiss scallop circle.
Assemble and enjoy your Sealed with a Kiss card.


Visit my online store to get your supplies for this project.  Remember that when you purchase $25 or more in product, you are eligible for my Rewards Program.

Creatively yours,

Sharon Cheng
Richland Hills, TX
My Online Store

Tuesday, February 19, 2013

Easter and Dress Up Cards


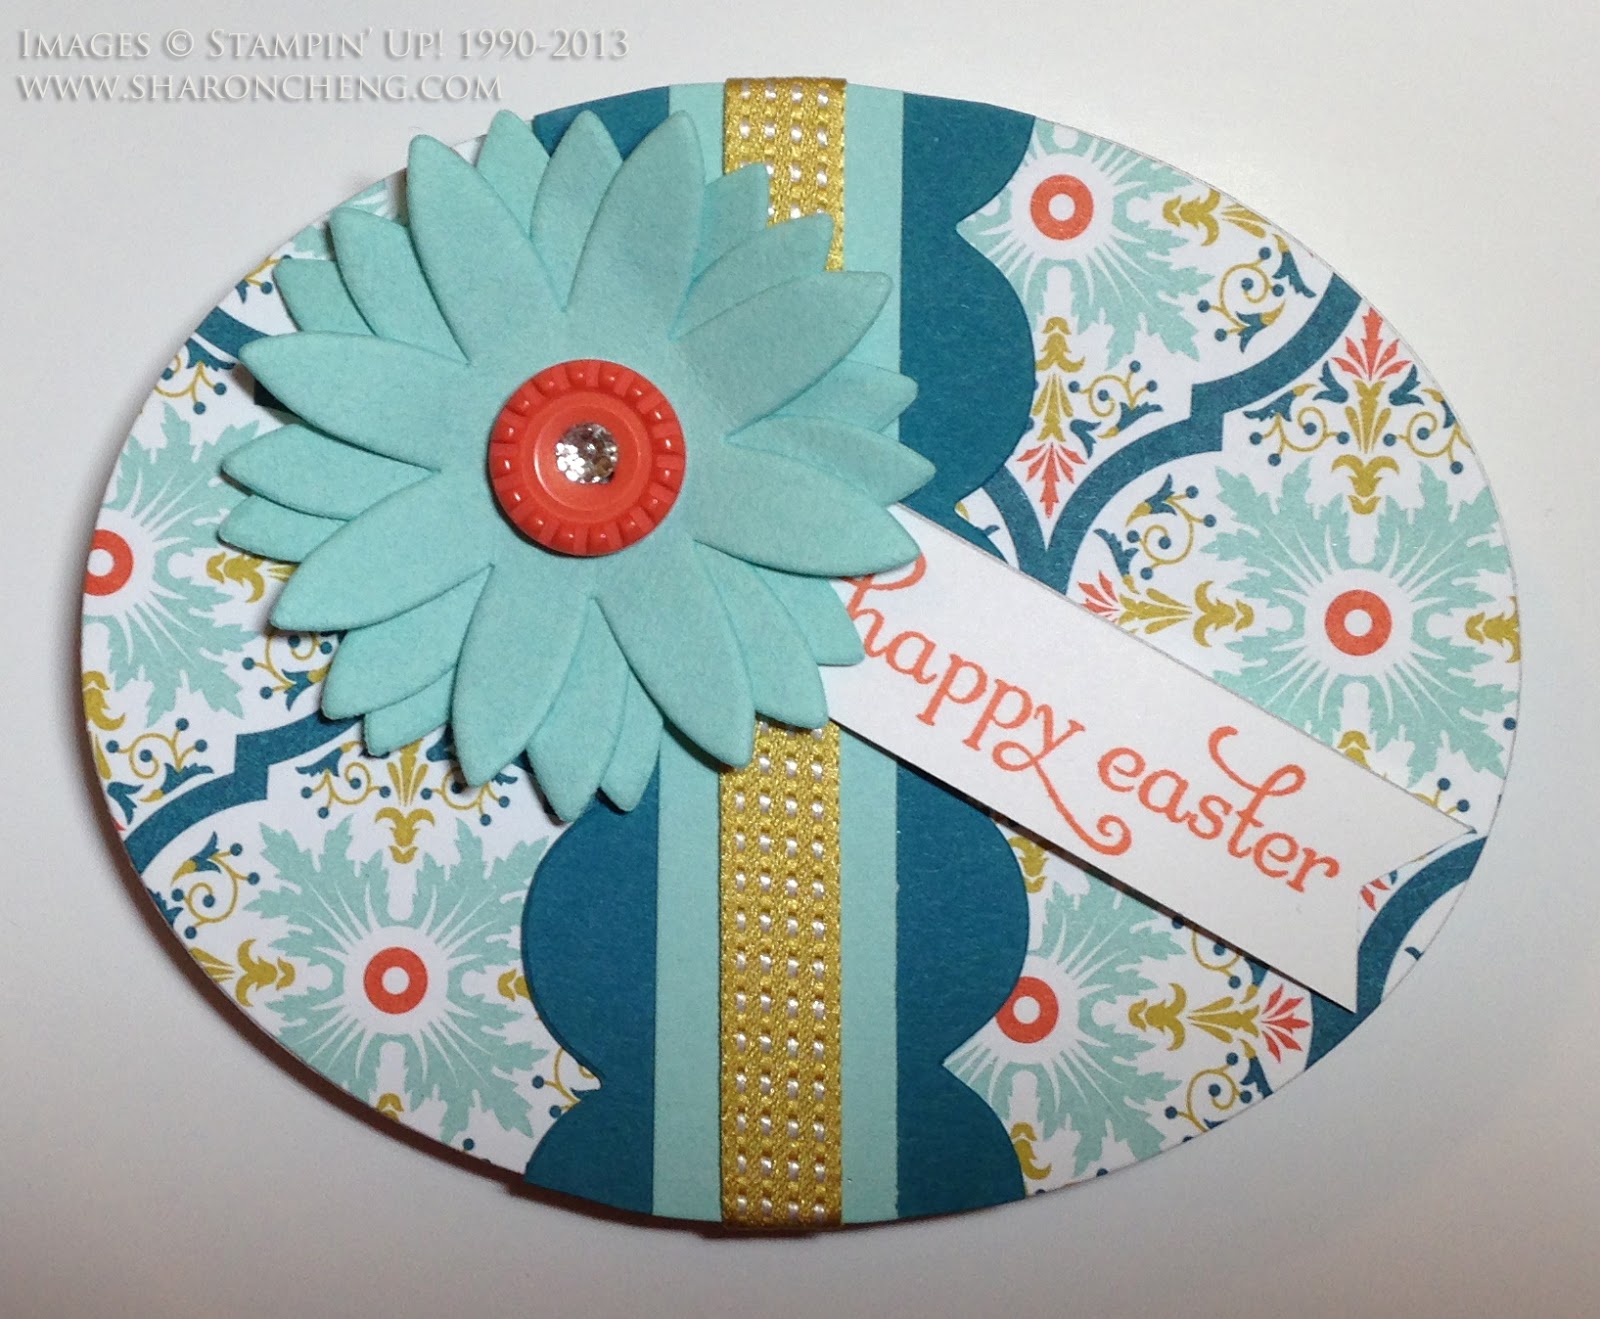
This Easter Egg card was made using Stampin' Up!'s Oval Framelits. Several of the people in my stamp club picked this as their favorite project because it was quick, easy and different from a traditional card. To make the card, I first cut an oval from the Sycamore Street Designer Series Paper in the Sale-A-Bration catalog.


The card body was cut using the same oval framelit (largest one without the scalloped edge).  To make the card, cut and fold a piece of Whisper White card stock.  Line up the framelit so that one part of the folded edge is inside the oval so it won't be cut.  When you run it through the Big Shot, you'll end up with an oval card.

Decorate your designer series paper egg and adhere to the card body.  The flower comes from Stampin' Up!'s Pop-Up Posies kit in the Spring catalog.


This second card was my personal favorite.  It's mostly because I love those little bunnies!  The Ears To You  stamp (132659  $6.95) is one of several single stamps that Stampin' Up! is offering.  The bunnies are heat embossed with white embossing powder on Stampin' Up!'s Twitterpated Designer Series Paper.  When you sponge on Pool Party and Wisteria Wonder, the bunnies stand out from the pink background.


One of the things that I like about clear mount stamps is that you can cut them apart and space them out on a clear block.  You can see how I cut the sentiment apart from the rest of the stamp to make room for the ribbon.


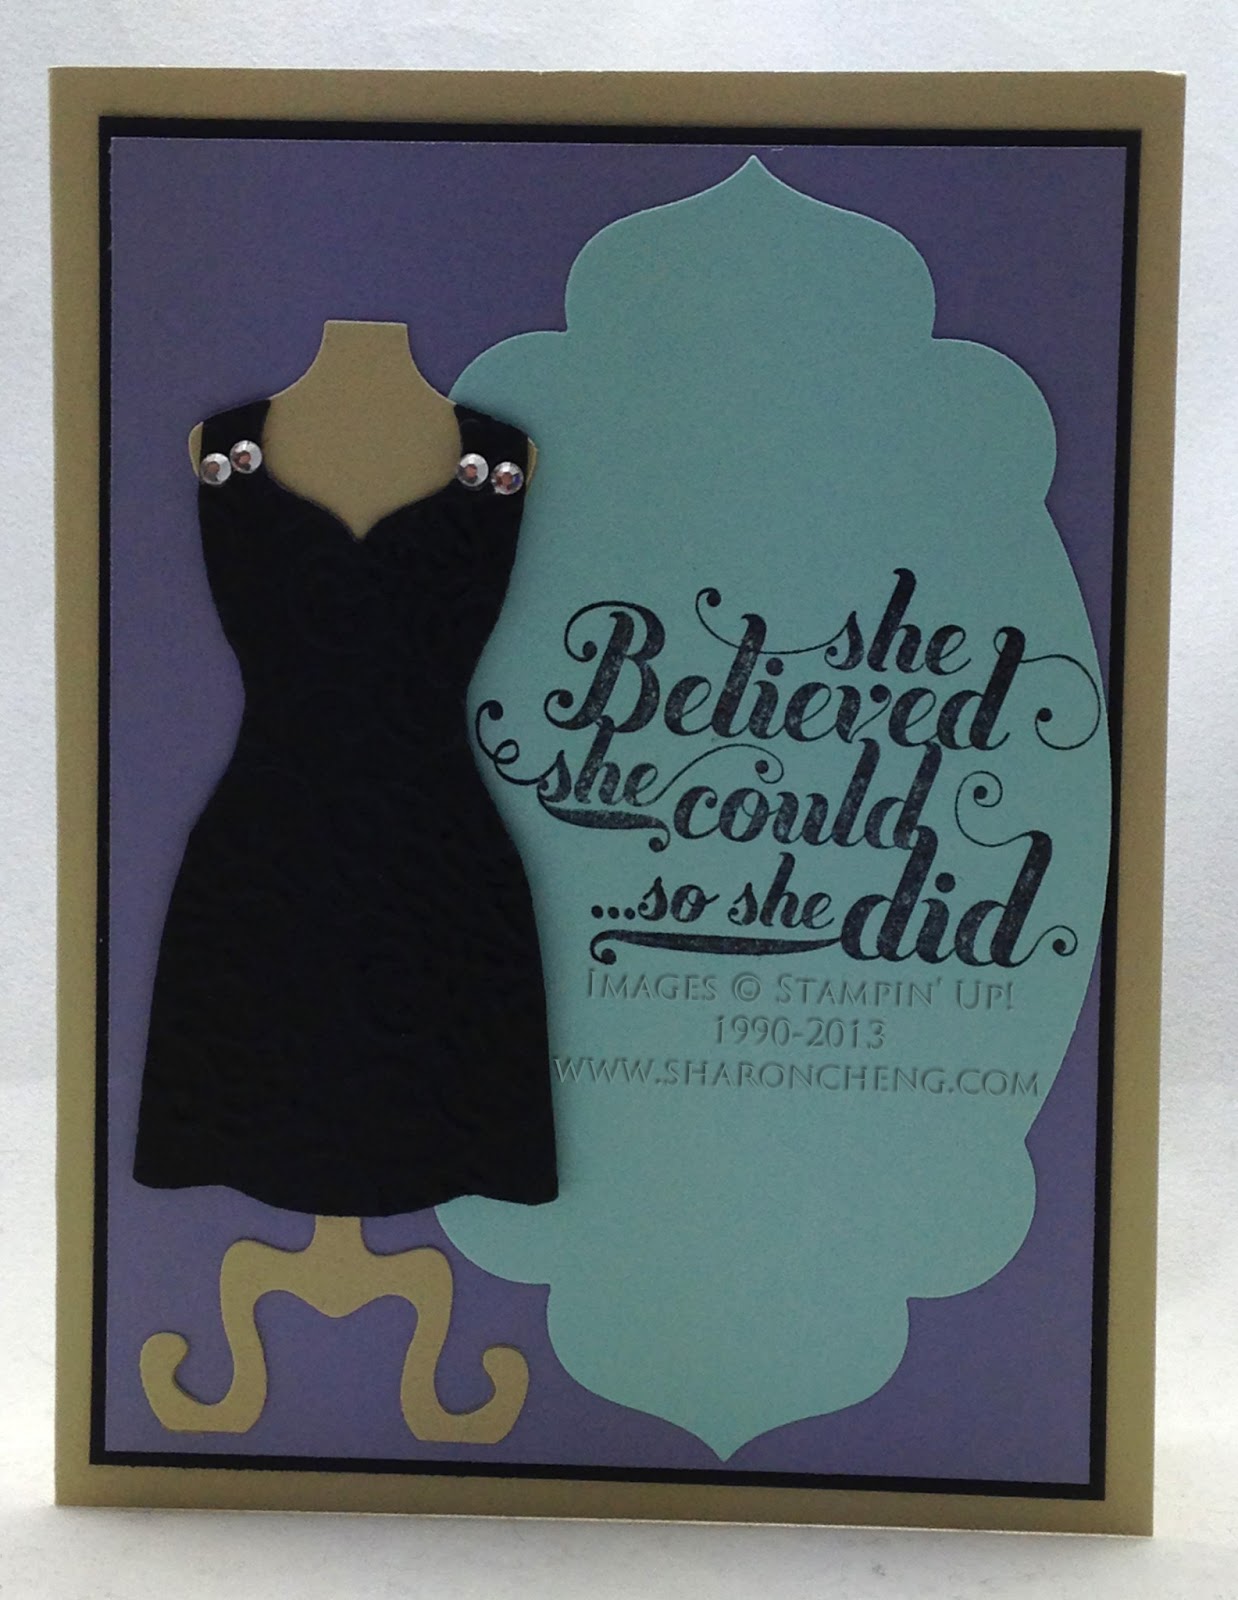
The last card for my February stamp club was inspired by a swap card that I got at Stampin' Up!'s Dallas Regional event.  Based on the swap cards I have seen, the Dress Up Framelits have been the most popular framelits from the Spring catalog.  I've seen many different versions of the dresses.  Everyone in club had fun decorating the dress they way they liked it using the rhinestone jewels.  Several people decorated the neckline and one person made a rhinestone belt.  That is why little black dresses are so popular.  They look different based on the accessories you use!  And this is one of my favorite quotes from the Feel Goods stamp set.

Stampin' Supplies

Item Description Price
122652 Delightful Dozen Stamp Set (Card 1) $24.95
129381 Ovals Framelits (Card 1) $26.95
120893 Tasteful Trim Bigz XL (Card 1) $42.95
131395 Pop-Up Posies Designer Kit (Card 1) $12.95
119246 Rhinestones (Card 1 and 3) $4.95
126846 Summer Starfruit Satin Ribbon (Card 1) $8.95
127540 Sycamore Street Designer Paper (Card 1) SAB
130812 Sycamore Ribbon & Buttons (Card 1 & 2) SAB
132659 Ears to You Stamp (Card 2) $6.95
127819 Lacy Embossing Folder (Card 2 and 3) $7.95
125406 Twitterpated Designer Series Paper (Card 2) $10.95
129684 Feel Goods Stamp Set (Card 3) $18.95
130101 Dress Up Framelits (Card 3) $24.95
127003 Apothecary Accents Framelits (Card 3) $24.95

Visit my online store to get your supplies for this project.  Remember that when you purchase $25 or more in product, you are eligible for my Rewards Program.

Creatively yours,

Sharon Cheng
Richland Hills, TX
My Online Store

Thursday, February 14, 2013

Custom Color Your Glimmer Paper for Valentine's Day


Did you know that you can color Stampin' Up!'s silver glimmer paper?  It's a snap with rubbing alcohol,  Stampin' Up! reinkers and a spritzer.  For a Valentine's Day project, my friend, Rose, asked if we could decorate a charger.  It was a lot of fun designing this project.

The problem was that Stampin' Up! only sells three colors of Glimmer Paper and I wanted some pink paper.  While we have several different colors of pink card stock, I really wanted something blingy.  That's when I decided to try coloring Stampin' Up!'s silver glimmer paper.  Because I didn't want to spend a lot of time waiting for things to dry, I decided to use rubbing alcohol instead of water.  In one of Stampin' Up!'s spritzer's, I added enough rubbing alcohol to fill the bottle about 1 inch from the bottom.  Then I added 6 - 8 drops of Cherry Cobbler reinker.  I covered some silver glimmer paper with the alcohol mix, dabbed most of it off with a paper towel and voila, some of the prettiest pink glimmer paper.

I plan to play with this technique for some Easter projects.  I think it will be easy to get different pastel colors for Easter.  I imagine this alcohol technique won't work as well for dark colors.  Stay tuned for more projects using dyed glimmer paper.


Another thing that I "re-colored" was the Antique Brad.  Compare the brad with the leaves on the left hand side in this picture with the brad on the right in the first picture.  Notice how much whiter it looks?  That's because I put a couple of drops of white acrylic paint on the top of the brad and then wiped it off with a paper towel.  The white paint stays in the crevices and you have a light-colored brad instead of a dark one.


Here is the complete charger.  While I thought about making the leaves green, I decided to keep it white-on- white so you would see the texture more than the leaves.   

Stampin' Supplies

Item Description Price
123779 You Are Loved Stamp Set $23.95
126367 Flowering Flourishes Stamp Set $17.95
123759 Papillon Potpourri Stamp Set $14.95
126185 Stampin' Spritzer (2 spritzers) $2.95
119788 Cherry Cobbler Classic Stampin Ink Refill $2.95
119854 1 3/4 in Scallop Circle Punch $16.95
127811 1 1/4 in Scallop Circle Punch $15.95
120404 7/8 in Scallop Circle Punch $12.95
129406 Bitty Butterfly Punch $15.95
127526 Elegant Butterfly Punch $15.95
119246 Rhinestone Basic Jewels $4.95
129406 Bitty Butterfly Punch $15.95
114511
Little Leaves Sizzlits
$5.50
120893 Tasteful Trim Bigz Die $42.95
117273

Antique Brads
$5.95
127555 Vintage Faceted Designer Buttons $5.95

Visit my online store to get your supplies for this project.  Remember that when you purchase $25 or more in product, you are eligible for my Rewards Program.

Creatively yours,

Sharon Cheng
Richland Hills, TX
My Online Store