


Home Classes Tutorials Online Store Join

Tuesday, February 19, 2013

Easter and Dress Up Cards


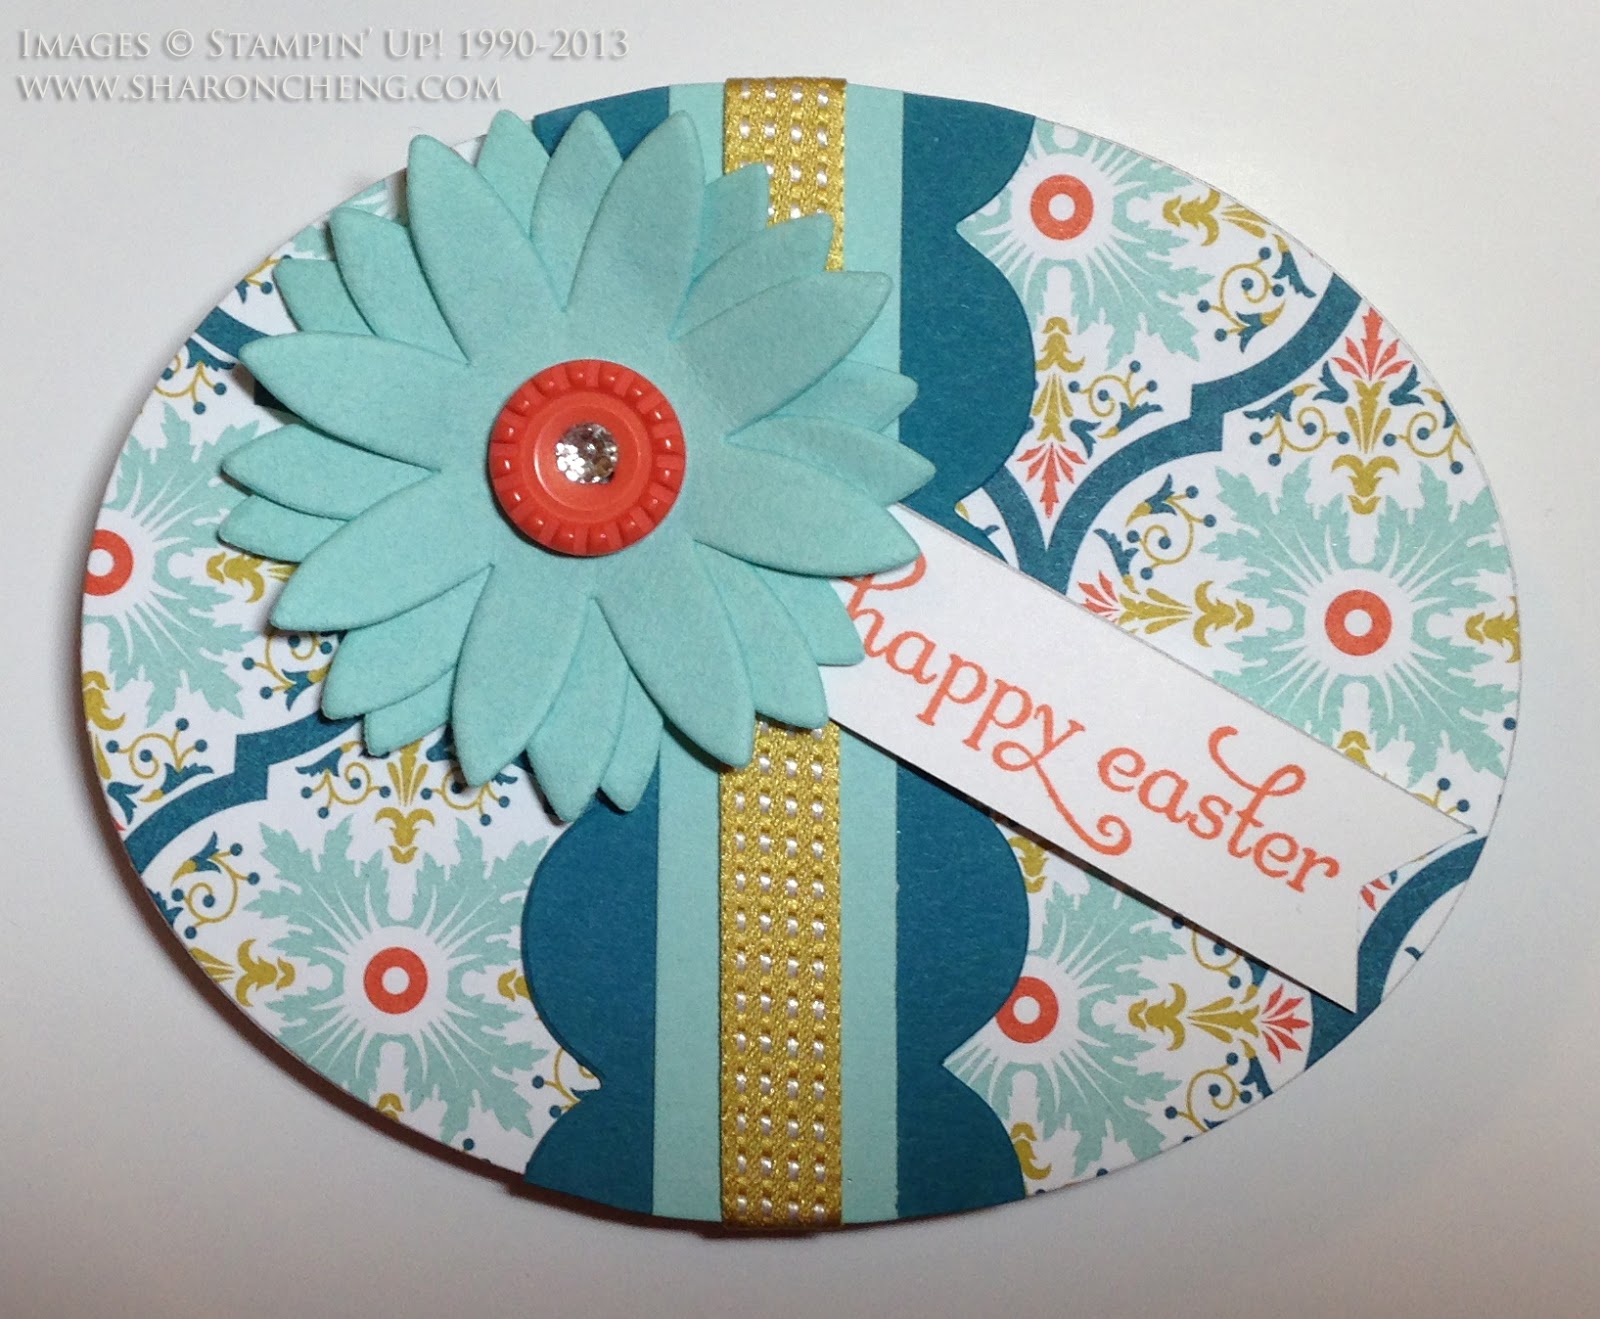
This Easter Egg card was made using Stampin' Up!'s Oval Framelits. Several of the people in my stamp club picked this as their favorite project because it was quick, easy and different from a traditional card. To make the card, I first cut an oval from the Sycamore Street Designer Series Paper in the Sale-A-Bration catalog.


The card body was cut using the same oval framelit (largest one without the scalloped edge).  To make the card, cut and fold a piece of Whisper White card stock.  Line up the framelit so that one part of the folded edge is inside the oval so it won't be cut.  When you run it through the Big Shot, you'll end up with an oval card.

Decorate your designer series paper egg and adhere to the card body.  The flower comes from Stampin' Up!'s Pop-Up Posies kit in the Spring catalog.


This second card was my personal favorite.  It's mostly because I love those little bunnies!  The Ears To You  stamp (132659  $6.95) is one of several single stamps that Stampin' Up! is offering.  The bunnies are heat embossed with white embossing powder on Stampin' Up!'s Twitterpated Designer Series Paper.  When you sponge on Pool Party and Wisteria Wonder, the bunnies stand out from the pink background.


One of the things that I like about clear mount stamps is that you can cut them apart and space them out on a clear block.  You can see how I cut the sentiment apart from the rest of the stamp to make room for the ribbon.
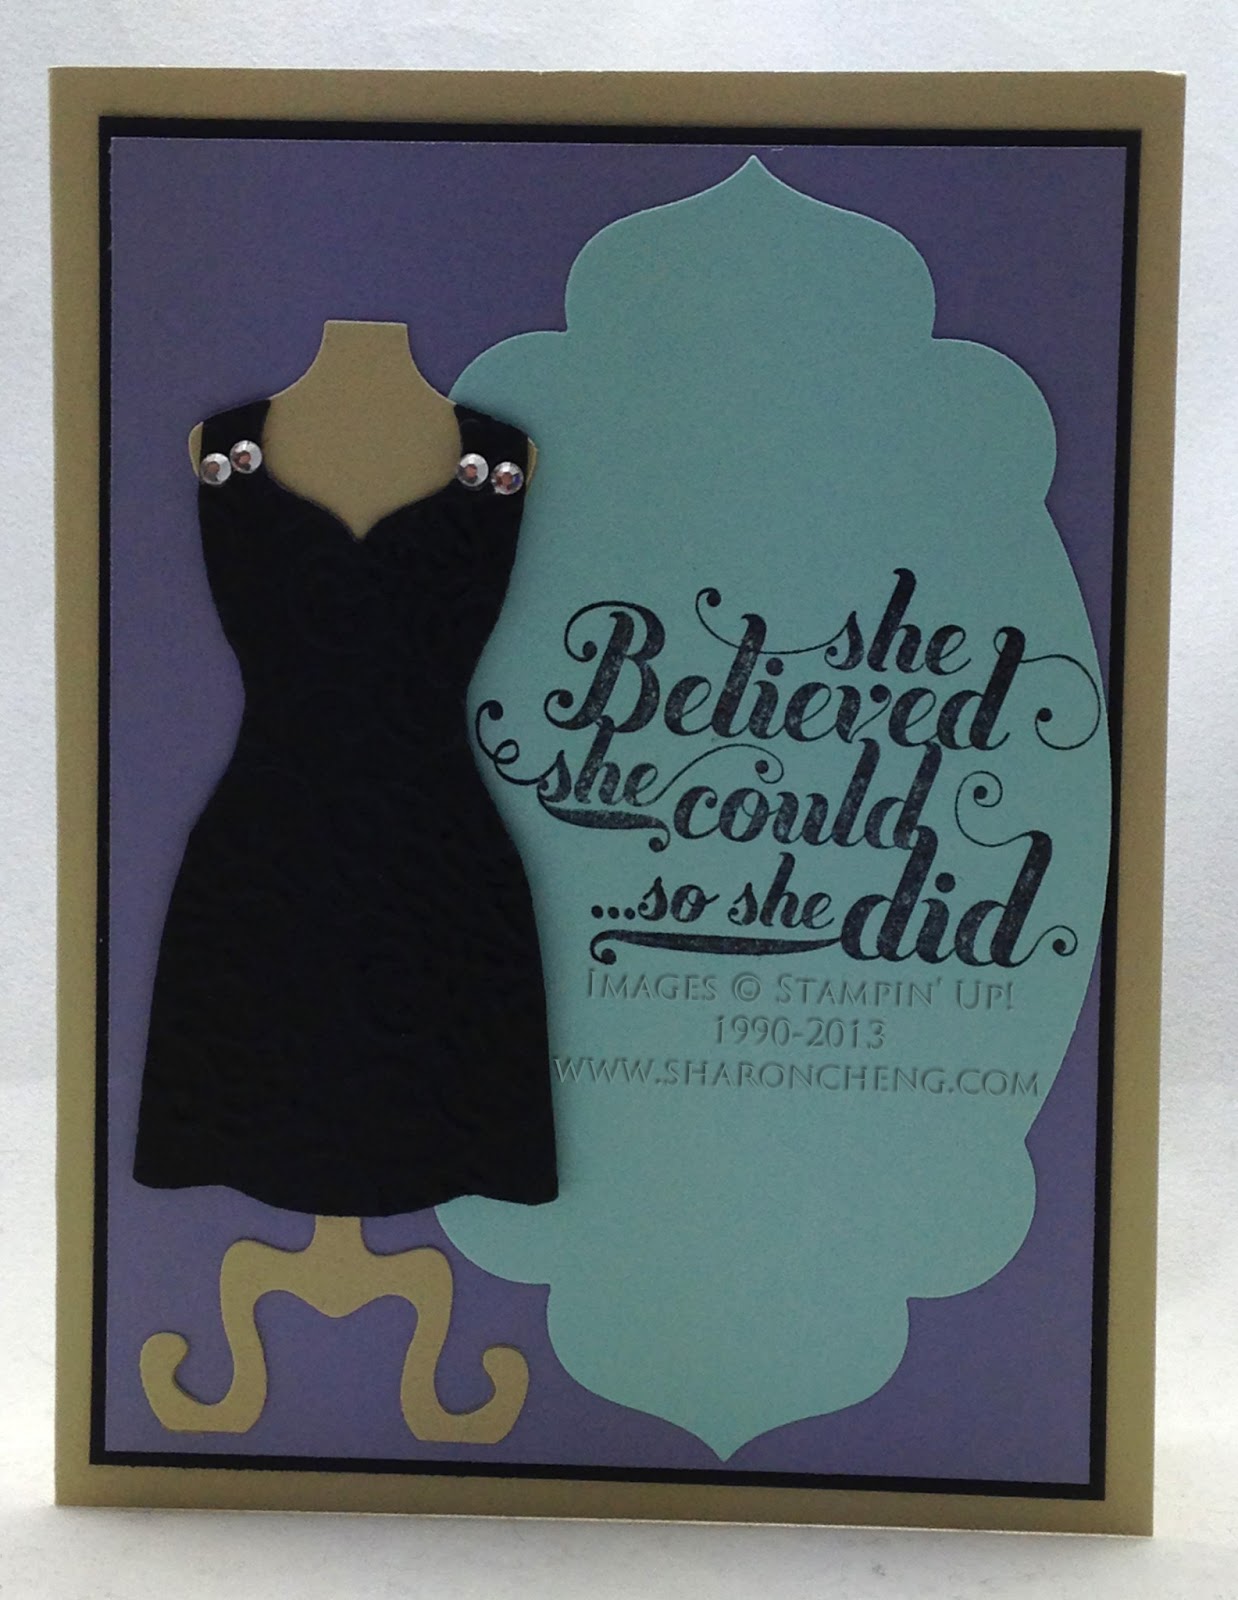

The last card for my February stamp club was inspired by a swap card that I got at Stampin' Up!'s Dallas Regional event.  Based on the swap cards I have seen, the Dress Up Framelits have been the most popular framelits from the Spring catalog.  I've seen many different versions of the dresses.  Everyone in club had fun decorating the dress they way they liked it using the rhinestone jewels.  Several people decorated the neckline and one person made a rhinestone belt.  That is why little black dresses are so popular.  They look different based on the accessories you use!  And this is one of my favorite quotes from the Feel Goods stamp set.

Stampin' Supplies

Item Description Price
122652 Delightful Dozen Stamp Set (Card 1) $24.95
129381 Ovals Framelits (Card 1) $26.95
120893 Tasteful Trim Bigz XL (Card 1) $42.95
131395 Pop-Up Posies Designer Kit (Card 1) $12.95
119246 Rhinestones (Card 1 and 3) $4.95
126846 Summer Starfruit Satin Ribbon (Card 1) $8.95
127540 Sycamore Street Designer Paper (Card 1) SAB
130812 Sycamore Ribbon & Buttons (Card 1 & 2) SAB
132659 Ears to You Stamp (Card 2) $6.95
127819 Lacy Embossing Folder (Card 2 and 3) $7.95
125406 Twitterpated Designer Series Paper (Card 2) $10.95
129684 Feel Goods Stamp Set (Card 3) $18.95
130101 Dress Up Framelits (Card 3) $24.95
127003 Apothecary Accents Framelits (Card 3) $24.95

Visit my online store to get your supplies for this project.  Remember that when you purchase $25 or more in product, you are eligible for my Rewards Program.

Creatively yours,

Sharon Cheng
Richland Hills, TX
My Online Store

Thursday, February 14, 2013

Custom Color Your Glimmer Paper for Valentine's Day


Did you know that you can color Stampin' Up!'s silver glimmer paper?  It's a snap with rubbing alcohol,  Stampin' Up! reinkers and a spritzer.  For a Valentine's Day project, my friend, Rose, asked if we could decorate a charger.  It was a lot of fun designing this project.

The problem was that Stampin' Up! only sells three colors of Glimmer Paper and I wanted some pink paper.  While we have several different colors of pink card stock, I really wanted something blingy.  That's when I decided to try coloring Stampin' Up!'s silver glimmer paper.  Because I didn't want to spend a lot of time waiting for things to dry, I decided to use rubbing alcohol instead of water.  In one of Stampin' Up!'s spritzer's, I added enough rubbing alcohol to fill the bottle about 1 inch from the bottom.  Then I added 6 - 8 drops of Cherry Cobbler reinker.  I covered some silver glimmer paper with the alcohol mix, dabbed most of it off with a paper towel and voila, some of the prettiest pink glimmer paper.

I plan to play with this technique for some Easter projects.  I think it will be easy to get different pastel colors for Easter.  I imagine this alcohol technique won't work as well for dark colors.  Stay tuned for more projects using dyed glimmer paper.


Another thing that I "re-colored" was the Antique Brad.  Compare the brad with the leaves on the left hand side in this picture with the brad on the right in the first picture.  Notice how much whiter it looks?  That's because I put a couple of drops of white acrylic paint on the top of the brad and then wiped it off with a paper towel.  The white paint stays in the crevices and you have a light-colored brad instead of a dark one.


Here is the complete charger.  While I thought about making the leaves green, I decided to keep it white-on- white so you would see the texture more than the leaves.   

Stampin' Supplies

Item Description Price
123779 You Are Loved Stamp Set $23.95
126367 Flowering Flourishes Stamp Set $17.95
123759 Papillon Potpourri Stamp Set $14.95
126185 Stampin' Spritzer (2 spritzers) $2.95
119788 Cherry Cobbler Classic Stampin Ink Refill $2.95
119854 1 3/4 in Scallop Circle Punch $16.95
127811 1 1/4 in Scallop Circle Punch $15.95
120404 7/8 in Scallop Circle Punch $12.95
129406 Bitty Butterfly Punch $15.95
127526 Elegant Butterfly Punch $15.95
119246 Rhinestone Basic Jewels $4.95
129406 Bitty Butterfly Punch $15.95
114511
Little Leaves Sizzlits
$5.50
120893 Tasteful Trim Bigz Die $42.95
117273

Antique Brads
$5.95
127555 Vintage Faceted Designer Buttons $5.95

Visit my online store to get your supplies for this project.  Remember that when you purchase $25 or more in product, you are eligible for my Rewards Program.

Creatively yours,

Sharon Cheng
Richland Hills, TX
My Online Store

Friday, February 8, 2013

Fast and Fun Valentine's Day Cards


Using Stampin' Up! products and these 4 fast and fun designs, Girl Scout Troop 1302 made 90 Valentine's Day cards in 50 minutes for Meals on Wheels recipients.  At the meeting, we had 17 excited and enthusiastic Brownies and 5 adults, including me.  We had 4 tables with one adult at each table guiding the girls through how to make the card featured at their table.  Every Brownie made one card of each design to give to Meals on Wheels.  After they completed their four cards, they got to pick their favorite card to make one more to give to someone else.  Completing a card for Meals on Wheels included writing a personal note to the recipient and letting them know the card was made especially for them by Girl Scout Troop 1302.

This first card went the fastest.  Everything was pre-cut and stamped, so the girls only had to assemble the card and then they could write their personal note.


To add to their personal notes, we had the Creatively Yours stamp set (122612  $14.95) available for the girls to use on the back.  Well, several of them used it on the inside and back of the card--many times.  :)  I love enthusiastic stampers who are willing to explore their creativity!


This card was probably redesigned the most.  The girls did not limit themselves to lining up the hearts.  They put them together in so many different ways.  Sometimes the sentiment was at the top of the card and sometimes at the bottom.  I loved how the Brownies came up with so many ways to use the hearts on this card.


This card went quickly because the four stamps were all clear mount and on one block.  You stamped the four images at one time and then added the ribbon.  I pre-tied the ribbon so all they had to do was stick it on the card.


There were a couple of times when I called this the chocolate candy card during our class.  The Brownies were quick to remind me that this was a chocolate kiss card.  Melody Smith made a more complex version of this card for our January demonstrator swap.  I CASED her card and simplified it for the Meals on Wheels project. Using the Blossom Petals punch to make the kiss make this card go very fast.  I pre-punched the kisses and stamped the sentiment.  All the girls had to do was trim the sentiment and assemble the card.  I should have taken a picture of one of the variations that was made with this card.  One of the Brownies drew hearts all the way around in the white border.  It looked wonderful!

Some quick tips if you are planning something similar where you will make a lot of cards very quickly with beginner stampers.  Notice that all 4 cards are on a white base and that cards 2 and 3 use pieces of card stock that are cut the same size.  That made cutting for these projects go very quickly.  I used the Big Shot and punches as much as possible to make it easy to make the design elements.  I pre-stamped and embossed where possible.  It was also helpful to pack the card parts for each card into one envelope.  That way everything the girls needed was at the table or in the envelope.

At each table, I only had one color of ink pad.  That way I didn't have to worry about ink pad colors getting mixed up.  By the way, Stampin' Up!'s new firm foam ink pads held up very well with some enthusiastic and more firm stamping than what would be recommended.  :)  Some of the clear blocks were covered with ink after our fast and furious stamping.  It was such a snap to clean the clear mount stamps and then rinse the clear blocks with water.  Everything looks good as new.  I would not be able to say that if I had used wood-mounted stamps.

I have been wanting to work with the Girl Scouts for some time now.  I love the look on children's faces (and adults too) when they look at something that they made by hand and are so happy and content with their creativity.  Andrea, the troop leader, was AMAZING.  She had 17 Brownies quiet and focused when she needed them to listen.  When it was their time to enjoy and create, they were laughing, giggling, (and wiggly), but consistently polite, making sure they shared their supplies and waited their turn.  She and the other parents made it look easy when we know it takes a lot of patience, consistency and work.

Thanks for listening to me babble on about how much fun I had with the Brownies of Girl Scout Troop 1302.  Stampin' Up! is about so much more than rubber stamping and making fun projects.  Hopefully, if you have the desire, you will also find a way to give back to your community that is meaningful to you.

Stampin' Supplies

Item Description Price
126412 Wacky Wishes Stamp Set (Card 1) Hostess
130733 Oh, Hello Stamp Set (Card 1) $18.95
126916 Patio Party Designer Series Paper (Card 1) $10.95
124005 Silver Glimmer Paper (Card 1, 3 and 4) $4.95
129406 Bitty Butterfly Punch (Card 1) $15.95
119859 XL Oval Punch (Card  1) $16.95
125596 Fashionable Hearts Embosslit (Card 1 and 2) $11.95
129636 Vintage Verses (Card 2) SAB
119246 Rhinestone Basic Jewels (Card 2) $4.95
129252 Hearts a Flutter Stamp Set (Card 3) $18.95
127802 Teeny Tiny Wishes Stamp Set (Card 3) $26.95
118074 Owl Punch (Card 3) $16.95
126257 Itty Bitty Banners Stamp Set (Card 4) $11.95
121790 Red Glimmer Paper (Card 4) $4.95
129378 Honeycomb Embossing Folder (Card 4) $7.95
121808 Blossom Petals Punch (Card 4) $16.95

Visit my online store to get your supplies for these projects.  Remember that when you purchase $25 or more in product, you are eligible for my Rewards Program.

Creatively yours,

Sharon Cheng
Richland Hills, TX
My Online Store


Wednesday, January 23, 2013

Sale-A-Bration Samples and Leadership 2013 Swaps


This was my stamp club's favorite card from my Leadership 2013 Swaps.  One of my customers even bought the Wisteria Wonder Card Stock (122922), Classic Ink Pad (126985) and Ruffled Ribbon (122973) to make this card.  The stamp set is From My Heart (126557) and it was die cut using the Labels Collection Framelits (125598).  Thank you, Karie Beglau, for swapping with me at Leadership 2013.

 
Janie Owens made this card using the Sale-A-Bration Vintage Verses stamp set (129636) and the Sale-A-Bration Sycamore Street Designer Series Paper (127540).  Notice that the stamped image also die cut with the same Labels Collection Framelit as the Wisteria Wonder card at the top.


Lyssa Griffin Zwolanek made this card  which also uses the Sycamore Street Designer Series Paper and the coordinating Ribbon and Button Pack (130812).  It shows some of the other colors that coordinate with this paper pack:  Island Indigo, Pool Party, Rich Razzleberry, Summer Starfruit, Tangerine Tango and Whisper White.


One of the demonstrators in my downline, Teresa Goff, made this card which also features the Sycamore Street Designer Series Paper and the coordinating Ribbon and Button Pack.  Teresa used the Ciao Baby stamp set (129648) from the Spring Catalog and the Sale-A-Bration Petite Curly Label Punch (129405).


Nicole Black did a wonderful job featuring the Sale-A-Bration Bloomin' Marvelous stamp set (129654) with her Leadership 2013 swap card.  The flowers, leaves, butterfly and sentiment all come from the same stamp set.  Talk about a versatile group of images.


Marilyn SanClemente made this card using two Sale-A-Bration stamp sets:  Madison Avenue (129660) and Vintage Verses.  She embossed the Whisper White card stock with Stampin' Up!'s exclusive Lacy Brocade Embossing Folder (127819).  This has been a popular embossing folder.  It was also used in the Wisteria Wonder card at the beginning of this post.

Now you know why I love swapping cards with other demonstrators at Stampin' Up! events like Leadership 2013.  It's a wonderful way to meet people and enjoy their creativity.

The Sale-A-Bration products are free during this Stampin' Up! promotion.  When you place a $50 order, you may pick one item from the Sale-A-Bration catalog for free!  You can place an online order or contact me at sharon@sharoncheng.com.

Visit my online store to get your supplies for these projects.  Remember that when you purchase $25 or more in product, you are eligible for my Rewards Program.

Creatively yours,

Sharon Cheng
Richland Hills, TX
My Online Store

Saturday, January 19, 2013

Valentine's Day Cards


These Valentine's Day cards use Stampin' Up!'s More Amore Specialty Designer Series Paper (129309 $12.95) from the Spring Catalog.  Coordinating colors are Pool Party, Primrose Petals, Real Red, Very Vanilla and Basic Black.  You can see from these cards how well these colors all go together.

This card was made by Marilyn Young.  It uses the Honeycomb Textured Impression Embossing Folder (129378 $7.95).  The hearts were made using the Small Heart Punch (117193 $5.95) and fit perfectly inside the honeycombs.


Janet Holmes made this card that shows how you can cut apart the hearts to use on separate cards.  She also featured the new Designer Builder Brads (129329 $6.95).  You get 16 brads in the package.  You can use the circle punch from the Itty Bitty Shapes Punch Pack (118309 $16.95) to put an image in the center of the brad and then cover it with the epoxy bubble included with the builder brads.  I used the last set of builder brads that Stampin' Up! offered a lot and like these even more.


Karen Altizer made this card using the Happy Valentine Heart stamp from the Valentine Treat Bundle which is only available through January 21st.  This bundle (132771 $5.95) contains the exclusive Happy Valentine Heart Single Stamp and a package of 1" x 8" cellophane bags.  The heart is easy to punch out with the Full Heart Punch (119883 $16.96).  It takes longer to fill the bags when you make treats using this bundle than it does to stamp and punch out the heart.


Judi Martin made this card using a couple of Sale-A-Bration items.  Sale-A-Bration starts on January 22nd.  You can get the exclusive Feeling Sentimental Stamp Set with the bicycle image and the Pool Party Button as part of the Sycamore Street Ribbon and Button Pack for free during this special one-time-a-year offer.  When you spend $50 you can choose from 19 different free products or bundles.  As Stampin' Up! demonstrators, we got to start celebrating Sale-A-Bration early.  Judi also used the That's the Ticket Stamp Set (128075 $16.95) and coordinating Ticket punch (126883 $15.95) for the Valentine's Day sentiment.  And in case you had not noticed, Judi likes to embellish her cards!  The hearts were cut out with the new Hearts a Flutter Framelit Dies (130159 $24.95).


And last, but definitely not least, is this card made by Samantha Eshleman.  She has combined many of the same products in a different way using the Full Heart, Small Heart and Ticket Punches.  She used one of my favorite Stampin' Up! papers, First Edition Specialty Designer Series Paper (121878 $12.95).  This light-weight paper looks like pages out of an old encyclopedia but it comes in 12 x 12 and it's acid and lignin-free.

Visit my online store to get your supplies for these projects.  The Valentine Treat Bundle is only available through January 21st.  The Sale-A-Bration products will be available starting January 22nd. Remember that when you purchase $25 or more in product, you are eligible for my Rewards Program.
Creatively yours,

Sharon Cheng
Richland Hills, TX
My Online Store

Friday, January 11, 2013

Live In Sunshine Happy Days Card


I got the inspiration for this Sunshine and Happy Days card from a post on Operation Write Home.  There is a tutorial for making this style of card called a starburst.

Because this card ended up being fairly quick and easy to make, I used it for a swap card at Stampin' Up!'s Leadership 2013 Conference in Orlando, Florida.  While it looks complicated, using the Big Shot and circle punch made the sun go very quickly.  Following the instructions on the OWH tutorial made the rest of the card much easier than I had thought it would be.

For this card, the starburst is built on a piece of paper that is 5 x 3 3/4".  The mat is 5 1/8 x 3 7/8 in.  If you've been following me for a while, you know that I like thin mats!  It's a style that I picked up from a folk art painting instructor.  She likes to add a thin mat to pull your eye toward the design.

For the grass, I cut a piece of Lucky Limeade card stock 2 x 5 and free hand cut the top edge. The top edge is lightly sponged. 

I have a close friend who has been ill and I wanted to make her a special card.  While I wanted her to know I was thinking of her, I did not want the usual get well sentiment.  I decided on this card because it reminds me of a quilt.  She likes quilting and papercrafting.

The Summer Smooches Designer Series paper is so bright and colorful that it helped make a cheerful card.  I have used this for other projects including a just for you card and birthday card.

Stampin' Supplies

Item Description Price
122887 Lacy and Lovely Clear-Mount Stamp Set $17.95
121970 Pursuit Of Happiness Clear-Mount Stamp $13.95
125409 Summer Smooches Designer Series Paper $10.95
120906 2 1/2 in Circle Punch $16.95
123126 Perfect Pennants Bigz L $32.95

Visit my online store to get your supplies for this project.  Remember that when you purchase $25 or more in product, you are eligible for my Rewards Program.

Creatively yours,

Sharon Cheng
Richland Hills, TX
My Online Store

Tuesday, January 1, 2013

Top Ten Cards From 2012


Happy New Year! Stamping has helped me connect to so many new friends.  I'm looking forward to another great year of creating and sharing.  Many thanks to Operation Write Home for suggesting this fun post.


These are my top 10 cards from 2012. It was harder to pick my favorite cards than I expected.   French Foliage Triple Stamping with a Twist is my favorite 2012 card. I combined triple stamping with sponging to make this card.  It's much easier to make than it looks!


I loved using the Blossom Punch and Modern Label punch to make this layered Easter cross


This Summer Smooches birthday card was one of my swap cards for convention.  I did several different versions of this card that uses small strips of paper. It's a great way to use up scraps!


This Bold Blossom card comes from the OWH Memorial Day blog hop.  It was fun using a sketch to design this card.


This Apothecary Art birthday card also uses up scraps of Stampin' Up!'s Twitterpated designer series paper.  Notice that it is the same basic sketch as the card above from the OWH Memorial Day bloghop.

This Birthday Candle card is quick and easy to make.  I used the Blossom Petals Builder punch to make the candle flames.


This little punch art chick was a favorite with my customers.  This is a 3 x 3 card.


Greeting Card Kids is one of my favorite stamp sets.  This Christmas card uses the digital version of this stamp set.


My most popular post in 2012 was my Thanksgiving Quirky Turkey.  I liked him so much that I used a picture of that project on this digital Thanksgiving card. 


And last, but not least, is this digital Flower card using Summer Smooches designer series paper.  If you are looking for something bright and cheery, the Summer Smooches collection is what you want!

Thanks for looking at my top 10 cards from 2012.  I'm looking forward to seeing what 2013 brings!


Visit my online store to get your supplies for this project.  Remember that when you purchase $25 or more in product, you are eligible for my Rewards Program.

Have fun visiting other OWH friends.

Creatively yours,

Sharon Cheng
Richland Hills, TX
My Online Store